

Cruise Wiring
Cruise control is an upgrade possible for all Smart Roadster & Fortwo 450 models with just a few steps.
Below is all you will need to guide you to fitting cruise control to your Smart
You will have to check if you have the wiring already, if not don't worry as it can be added.
You will have to remove the plastic between the steering wheel and the speedo to gain access to the wiring location.
There are 4 holes which have 4 Torx10 screws at the top.

Remove the 4 Torx 10 screws using a thin T10 screw driver

Find the 3 pin plug shown above, if cruise control has never been fitted to your car before it will be taped to the wiper stalk wiring. If you find this plug you can skip to step 11

If you can't find the plug you can purchase the wiring adapter from the store below
Adapter shown in picture below

To fit this wiring you will have to remove the SAM unit, follow Removing SAM guide below.
With the SAM out of the way, feed the 3 pins & wiring down through the dash and into the foot well.
These 3 pins will be added to the White and Black plug you can see in the picture behind the wiring.
These plugs are labelled on the SAM unit as N11-8 (BLACK) and N11-9 (WHITE).

The grey plug within the white plug (N11-9) needs to be removed.
There is a latch on the top side, press this in whilst pushing the grey plug out from the opposite side.

As you can see close up the pins are numbered 1 through to 10. On the opposite side of the plug they are numbered 11 to 20.
Slide the pin coming from the Red/Pink wire into slot 7 as shown above
Slide the pin coming from the Blue/Green wire into slot 10 as shown above
You can now slide the grey plug back in to the white plug

The final pin with black/green wire goes in to the grey plug within the black plug (N11-8).

Slide the pin with Black/Green wire in to slot 11, this is on the opposite side from 1-10 (located just behind slot 1 as see in the picture). I forgot to take a picture of the opposite side but the slots are clearly numbered.
Once securely fitted slide the grey plug back in to the black plug.
Refit the SAM unit using the SAM Unit Removal guide in reverse.

After fitting the wiring you should have the layout seen below just like the cars that have the loom from the factory.
Remove the standard wiper stalk and unplug it. (there is a latch between the two brackets on the column to unlatch the wiper stalk)
Fit the wiring for the wipers & cruise in to the new cruise control stalk and rebuild the dash. You should have something that looks like the second picture below.
Cruise Control requires a TAN code to activate the cruise functions. The wiper functions will still operate until you get it activated.
Any Smart specialist including myself or Mercedes dealer can carry out TAN coding.

JavaScript seems to be disabled in your browser. You must have JavaScript enabled in your browser to utilize the functionality of this website.
- My Wishlist
- CAN Bus Interfaces
- Imported Vehicle Conversion Products
- Cruise Control Systems
- Speed Limiters
- Speed Limiting Systems
- Car Electronics Web Shop >
- Cruise Control Systems >
- Smart Cruise Control >
PRECISION CRUISE CONTROL SMART FORFOUR

Quick Overview
Email to a Friend
* Required Fields
- Add to Wishlist
- | Add to Compare
Product Tags
Use spaces to separate tags. Use single quotes (') for phrases.
- Product Description
- Installation & Specification
- Compatibility List
The PRECISION CRUISE CONTROL SMART FORFOUR is an Original Equipment quality, retrofit Cruise Control System. This particular system is compatible with the following vehicles:
Smart ForFour 2004 - 2006
PRECISION CRUISE is a retrofit electronic cruise control system that provides all the functionality and convenience of Original Equipment systems, along with many enhanced features. This unit comes pre-programed for your specific vehicle and the full vehicle compatibility list can be found under the compatibility tab above.
Luxury and Convenience
Our PRECISION CRUISE Control Systems take all the stress and frustration out of long distance travelling. Simply activate the Cruise Control and remove your foot from the accelerator pedal for a much smoother and more comfortable driving experience. Should you wish to increase or decrease your speed to suit driving conditions or traffic flow speeds, the cruise control provides the option to increase or decrease your speed by pressing the respective button on the cruise control arm.
Dual Memory Settings
The PRECISION CRUISE Control System features the ability to preset two Cruise speeds in the Cruise memory. This enables you to drive at your most commonly used cruise speeds at the touch of a button, without having to drive to the desired speed first.
Original Equipment Quality Equipment
All of our Cruise Contol Equipment is OE Quality and comes complete with a 'Plug n Play' Pedal Harness to reduce Installation time and cost. Our Universal Cruise Arm (pictured) is an OE Quality Cruise Arm with all the required functionality and performance of original equipment systems. However, there is also the option on certain vehicles to incorporate the Original Equipment Cruise Control Switch for an even more professional installation.
Independent Speed Limiting
The Cruise Control also features the option of setting an Independent Speed Limit. This is controlled via the Universal Cruise Arm and can be activated to prevent the driver from speeding in areas where speed limit restrictions are enforced. The Cruise control can still be used independently below this limit. Please note that this facility is not available on vehicles where the Original Equipment Cruise Switch has been installed.
Reduces the Risk of Speeding Fines
Recently, there has been a dramatic increase in the number of speed cameras and police surveillance equipment on the roads. Using the PRECISION CRUISE enables the driver to mainatain a safe (and legal) speed limit without the worry of being penalised.
Driving Optimisation and Fuel Saving
When the Cruise Control is activated, the vehicle speed is regulated more than 50 times per second, optimising driving performance. This in turn can also reduce fuel and transportation costs without comprimising vehicle performance.
Installation Service
We also provide a full installation service of all our PRECISION CRUISE SYSTEMS. Please contact us directly to arrange a quotation and book an appointment.
PLEASE SELECT YOUR VEHICLE IN THE BOX ABOVE SO THAT WE CAN PROVIDE YOU WITH THE CORRECT SYSTEM. PLEASE CONTACT US DIRECTLY IF YOU DO NOT SEE YOUR VEHICLE ON OUR COMPATIBILITY LIST AS WE MAY BE ABLE TO PROVIDE A SOLUTION FOR YOU.
Due to the unique nature of this product, certain vehicles may incur a lead time for despatch and next day delivery may not always be available.
The PRECISION CRUISE comes complete with a Universal Cruise Arm that can be installed on the steering column. Most kits also come with a ready made 'Plug n Play' pedal harness for easy installation
Full, vehicle specific, Installation Instructions will be provided with each Cruise Control System purchased.
VEHICLE COMPATIBILITY LIST
IF YOUR VEHICLE IS NOT LISTED BELOW, PLEASE CONTACT US DIRECTLY TO SEE IF WE CAN PROVIDE A SOLUTION FOR YOU
You have no items to compare.
What is your favorite Magento feature?
- Layered Navigation
- Price Rules
- Category Management
- Compare Products
Information
- Customer Service
- Privacy Policy
- Search Terms
- Advanced Search
- Orders and Returns
NCS Systems trading as CANM8 Limited, Unit A2, Langham Park, Maple Road, Castle Donington. Derby. DE74 2UT
+44 (0)1332 855100


- SMART Manuals
- Operating instructions manual
SMART roadster Operating Instructions Manual
- page of 258 Go / 258
Table of Contents
- Operating Instructions
Getting Acquainted
- Unlocking and Locking
- Adjusting the Seats
- Adjusting the Mirrors
- Power Windows
- Belt Tensioners and Belt Force Limiters
- Cockpit, Left Hand Drive Model
- Cockpit, Right Hand Drive Model
- Control Lever, Left
- Control Lever, Right
- On Board Instruments
- Upper Centre Console
- Lower Centre Console
Illuminating
- Interior Light
- Turn Signal Lights
- Warning Sounds and Indicator Lights . 2
Adjustments
- Heater/Ventilation
- Air Conditioning Plus System
- Windscreen Wipers
- Rear Window Heater
- Outside Mirror Heaters
- Seat Heater
- General Information
- Smart Radio One
- Smart Radio Five
- Smart Radio Navigator
- Smart CD Changer* and CD Box
- On Board Computer
- Telephone Console* and Universal Hands Free System
- Smart Webmove Package
Variability
- From Soft Top to Open Roadster
- From Open Roadster to Soft Top
- From Hardtop* to Open Roadster
- From Open Roadster to Hardtop
- Notes on the Soft Top System
Child Friendly
- Child Restraint Systems
- Using Child Restraint Systems
- Recommended Child Restraint Systems
On the Move
- Before Driving off
- Driving in the Winter
- Driving with the Catalytic Converter 7
- Driving Notes
- Cruise Control
- Speed Limiter
- Electronic Stability Program (Esp)
- Parking Assist
- Storage Compartments and Trays
- Luggage Compartment
- Multifunction Box* (Only Roadster Coupé)
- Luggage Compartment Cover for Roadster Coupé
- Rear Luggage Rack
- Loading Guidelines
- Engine Oil Level
- Checking Operating Fluids
- Tyre Inflation Pressure
- Wiper Blades
- Adjusting the Wiper Nozzles
Helpful Hints
- On Board Diagnosis Socket (OBD)
- Breakdown Set
- Wheel Theft Protection
- Tyres and Wheels
- Roll Starting
- Fire Extinguisher
Data Transfer
- Information Signs (Example: Left Hand Drive Model)
- Model Plate
- Technical Data
- Homologation Numbers
- Official Homologation
Advertisement
Quick Links
- 1 On Board Instruments
- Download this manual
Operating instructions
Related manuals for smart roadster.

Summary of Contents for SMART roadster
Page 1: operating instructions, page 2: good news, page 3: table of contents.
- Page 4 Fire extinguisher* ....10 37 roadster coupé* ....8 14 Rear luggage rack* ... . . 8 16 Loading guidelines .
- Page 5 !"#$%&'()*$#+,,-#.#/01,,2034567(809:;<%%=##>*7)*#C##@%4)&5A#-1;#B=)%<*$#-,,C##??DC?#?? Introduction Introduction >>Getting acquainted. >>On the move. > For an initial impression. > Driving and everything that it The concept of these operating involves. instructions >>Illuminating. Driving a vehicle is just one of its > All about the lights. >>Loading up.
- Page 6 !"#$%&'()*$#+,,-#.#/01,,2034567(809:;<%%=##>*7)*#1##@%4)&5A#-1;#B=)%<*$#-,,C##??DC?#?? Introduction Clarity is our aim Safety instructions Notes Fewer words can often say more. To help Safety instructions draw your attention >Note! you enjoy reading these texts and to potential hazards that could damage Notes provide supplementary concentrate on what really matters, we your health or even have fatal information on a topic.
- Page 7 For this reason, it is essential to read Be sure that you also read the chapter or to original smart accessories that can the sections marked with this symbol. >>Child friendly. be installed in a qualified specialist workshop, such as a smart center.
Page 8: Getting Acquainted
Page 9: unlocking and locking.
- Page 10 !"#$%&'()*$#+,,-#.#/01,,2034567(809:;<%%=##>*7)*#E##@%4)&5A#-1;#B=)%<*$#-,,C##??DC?#?? Unlocking and locking Unlocking and locking the car from Locking the car with the remote control the outside Danger of injury! Never leave children Accident risk! unsupervised in the car, even if they When opening the doors, take care are secured by a child restraint system.
- Page 11 !"#$%&'()*$#+,,-#.#/01,,2034567(809:;<%%=##>*7)*#C##@%4)&5A#-1;#B=)%<*$#-,,C##??DC?#?? Unlocking and locking Remove the key and exit the vehicle with the key in your hand. Close the driver door. > The car is now locked. Press button (A) once. When the car will not lock using the > The turn signal lights flash three remote control times.
- Page 12 !"#$%&'()*$#+,,-#.#/01,,2034567(809:;<%%=##>*7)*#1##@%4)&5A#-1;#B=)%<*$#-,,C##??DC?#?? Unlocking and locking Automatic locking functions Switching off the drive lock function Switch off the ignition. auto relock function Press the central locking switch and If you do not open either the driver or the unlocking button on the remote passenger door after unlocking the car control at the same time.
- Page 13 Emergency unlocking of the driver's door door handle (C). workshop, such as a smart center. If it is no longer possible to unlock the If the driver's door is open a warning car with the remote control, the door can signal will be sounded: be opened using the key.
- Page 14 !"#$%&'()*$#+,,-#.#/01,,2034567(809:;<%%=##>*7)*#G##@%4)&5A#-1;#B=)%<*$#-,,C##??DC?#?? Unlocking and locking >Note! >Note! If you fail to replace the transmitter Replace the remote control's transmitter battery, after approximately 100 presses battery every two years at the latest. of the remote control: Otherwise there is a danger of leakage! you will not be able to lock or unlock The remote control could be destroyed.
- Page 15 !"#$%&'()*$#+,,-#.#/01,,2034567(809:;<%%=##>*7)*#H##@%4)&5A#-1;#B=)%<*$#-,,C##??DC?#?? Unlocking and locking Take the transmitter battery (B) out of the board. Insert the new transmitter battery, checking that the polarity is correct. > Type of battery: lithium cell CR 1225 Press both sides of the key casing back together again.
Page 16: Adjusting The Seats
- Page 17 !"#$%&'()*$#+,,-#.#/01,,2034567(809:;<%%=##>*7)*#?,##@%4)&5A#-1;#B=)%<*$#-,,C##??DC?#?? Adjusting the seats Longitudinal seat adjustment Pull up the handle (A). Move the seat to the desired position. Accident risk! Release the handle. Whenever the seat has been moved > The locking mechanism must audibly forward or back, ensure that it engages engage on both sides.
- Page 18 !"#$%&'()*$#+,,-#.#/01,,2034567(809:;<%%=##>*7)*#??##@%4)&5A#-1;#B=)%<*$#-,,C##??DC?#?? Adjusting the seats Adjusting the backrest inclination >Note! Only the driver's seat can be adjusted. Release the backrest. Turn handwheel (A) forwards or backwards. Armrest* The armrest is located between the seats. The armrest can be used by the driver and the passenger and assists in creating a relaxing, non fatiguing trip.
- Page 19 !"#$%&'()*$#+,,-#.#/01,,2034567(809:;<%%=##>*7)*#?-##@%4)&5A#-1;#B=)%<*$#-,,C##??DC?#?? Adjusting the seats Folding down the passenger's seat Danger of injury! Do not place any hot drinks or Danger of injury! glass bottles in the stowage Put only suitable receptacles in compartment when the vehicle is in the stowage compartment. Occupants motion.
- Page 20 !"#$%&'()*$#+,,-#.#/01,,2034567(809:;<%%=##>*7)*#?E##@%4)&5A#-1;#B=)%<*$#-,,C##??DC?#?? Adjusting the seats To fold back: Danger of injury! When returning the passenger backrest to its upright position, please ensure that no hands or any obstacles are jammed in the lock. both levers audibly engage. Otherwise, in the event of an accident or a sudden application of To fold the seat down: Press both levers (D) backwards at the...
Page 21: Adjusting The Mirrors
- Page 22 !"#$%&'()*$#+,,-#.#/01,,2034567(809:;<%%=##>*7)*#?1##@%4)&5A#-1;#B=)%<*$#-,,C##??DC?#?? Adjusting the mirrors >Note! The outside mirrors can only be adjusted when the ignition is switched on. Electrically adjustable outside mirror* Adjusting the inside rearview mirror The rocker switch is located behind the Set the rearview mirror to the desired gearshift lever.
Page 23: Power Windows
Page 24: seat belts.
- Page 25 If seat belts have been damaged or subjected to high loads in an accident, have them replaced and have the belt anchorages checked. For safety reasons, smart gmbh recommends using only seat belts that smart gmbh has specifically approved for your vehicle.
- Page 26 !"#$%&'()*$#+,,-#.#/01,,2034567(809:;<%%=##>*7)*#?2##@%4)&5A#-1;#B=)%<*$#-,,C##??DC?#?? Seat belts >Note! Danger of injury! If the seat belt is to be run above or below Modifications or work performed the seat belt guide, the belt must be taken inexpertly to a restraint system (seat out of the guide. belt and anchorages, belt tensioners, belt force limiters or airbag) or its wiring and any alterations made to...
- Page 27 !"#$%&'()*$#+,,-#.#/01,,2034567(809:;<%%=##>*7)*#-,##@%4)&5A#-1;#B=)%<*$#-,,C##??DC?#?? Seat belts Putting on the seat belts Taking off the seat belts Take a seat. Press the red button on the belt buckle. Pull the seat belt without jerking it Let the belt run back into the belt from the roller. guide.
Page 28: Belt Tensioners And Belt Force Limiters
- Page 29 Some triggered, have them replaced in a dust may be generated. qualified specialist workshop. smart gmbh recommends that you visit a smart center for this. It is particularly important to have safety relevant work and work on safety relevant systems performed by a qualified specialist workshop.
Page 30: Cockpit, Left Hand Drive Model
Page 31: cockpit, right hand drive model, page 32: control lever, left, page 33: on board instruments.
- Page 34 > Indicator light goes out if the engine is started and oil pressure is qualified specialist workshop engine is running. sufficient. such as a smart center. It flashes: Beware of the following! if the engine has overheated. >Important! If the indicator light goes out before...
- Page 35 If the indicator light still does not Immediately park your car away from go out, take the car to a qualified moving traffic. specialist workshop, e.g. a smart Secure your car against rolling away center, without delay. if you have to leave it.
- Page 36 Take the car to a qualified There will then be an increased risk of such as a smart center. specialist workshop, e.g. a smart the vehicle skidding in certain center, without delay.
- Page 37 Assistance or a moving traffic. qualified specialist workshop Secure your car against rolling away such as a smart center. if you have to leave it. Do not drive any further. Call a breakdown recovery service such as smartmove Assistance or a qualified specialist workshop such as a smart center.
- Page 38 > the hazard warning lights are switched on. >Note! If a turn signal light malfunctions, the flashing frequency is doubled. Change the bulb (see page 10 8) or take the car to a qualified specialist workshop, e.g. a smart center. Getting acquainted 1 31...
- Page 39 The operating principle of the airbags 2. The airbag indicator light goes out you visit a smart center for this. It is and additional information to this after a maximum of 4 seconds for particularly important to have safety...
- Page 40 15 seconds: does not come on when a baby carrier is carry a child on the passenger's seat in > Special smart baby carrier on the fitted to the passenger's seat, the a child restraint system that faces to passenger's seat has been...
- Page 41 > Indicator light goes out after the engine is started or after 10 seconds if the engine electronics are functioning properly. If it comes on during a journey: Take the car to a qualified specialist workshop, e.g. a smart center. 1 34 Aufschlussreiches...
- Page 42 !"#$%&'()*$#+,,-#.#/01,,2034567(809:;<%%=##>*7)*#E1##@%4)&5A#-1;#B=)%<*$#-,,C##??DC?#?? On board instruments Tachometer >Important! The tachometer displays the engine Always pay attention to the gear shift speed in units of 100 rpm. recommendations indicated in your car's Driving in the optimum engine speed gear indicator (see page 7 10). range helps you to save fuel.
- Page 43 !"#$%&'()*$#+,,-#.#/01,,2034567(809:;<%%=##>*7)*#EF##@%4)&5A#-1;#B=)%<*$#-,,C##??DC?#?? On board instruments Display illumination The display illumination lights up: when the lights are switched on. when the ignition is switched on. The display illumination goes out 30 seconds after switching the lights off. switching the ignition off. the button is pressed again to change the mode of the multi functional display (see page 1 37).
- Page 44 !"#$%&'()*$#+,,-#.#/01,,2034567(809:;<%%=##>*7)*#EG##@%4)&5A#-1;#B=)%<*$#-,,C##??DC?#?? On board instruments Briefly press the button (A) twice in succession. > The service interval indicator appears on the display. >Note on outside temperature display* The temperature display will respond sluggishly when temperatures rapidly rise or fall. This ensures that the temperature reading is not falsified by the heat of the engine e.g.
- Page 45 !"#$%&'()*$#+,,-#.#/01,,2034567(809:;<%%=##>*7)*#EH##@%4)&5A#-1;#B=)%<*$#-,,C##??DC?#?? On board instruments No gear engaged Shifting system fault Automatic mode CAN (data bus) malfunction (icon flashes) Digital gear indicator The gear indicator (A) displays information on the sequential transmission: Gear engaged Activated electronic immobiliser (see 7 5) Upshift Downshift Neutral, no gear engaged Reverse gear is engaged...
- Page 46 !"#$%&'()*$#+,,-#.#/01,,2034567(809:;<%%=##>*7)*#E2##@%4)&5A#-1;#B=)%<*$#-,,C##??DC?#?? On board instruments Advancing the time Keep the button (B) depressed until the desired time appears on the display. Reversing the time Keep the button (A) depressed until the desired time appears on the display. >Note! The setting speed increases when buttons (A) or (B) are depressed for an extended amount of time.
- Page 47 Fuel tank gauge Take the car to a qualified The tank's fuel level is displayed with specialist workshop, e.g. a smart the aid of eight bar segments. center. The number of shaded segments indicates the level of fuel in the tank. If all eight segments are dark, the tank is full.
- Page 48 !"#$%&'()*$#+,,-#.#/01,,2034567(809:;<%%=##>*7)*#C?##@%4)&5A#-1;#B=)%<*$#-,,C##??DC?#?? On board instruments Activate service interval display Service interval display Briefly press button (A) on the multi The service interval display informs you function display twice. of the point in time and scope of the next service visit. An upcoming service visit is shown in the display approximately one month in advance.
- Page 49 !"#$%&'()*$#+,,-#.#/01,,2034567(809:;<%%=##>*7)*#C-##@%4)&5A#-1;#B=)%<*$#-,,C##??DC?#?? On board instruments Accident risk! Even if the temperature indicated is slightly above freezing, there could still be black ice on the road, particularly where it passes through trees or over bridges. You should therefore always adapt your driving style and speed to the weather, road and traffic conditions, to reduce the risk of accidents.
Page 50: Upper Centre Console
Page 51: lower centre console, page 52: illuminating, page 53: light.
- Page 54 !"#$%&'()*$#+,,-#.#/01,,2034567(809:;<%%=##>*7)*#E##@%4)&5A#-1;#B=)%<*$#-,,C##??DC?#?? Lights Daytime driving lights Switching on daytime driving lights If your car is equipped with daytime Switch off the ignition. driving lights , the low beam and parking Operate the headlight flashers. lights come on automatically when you At the same time, press the button for drive off.
- Page 55 !"#$%&'()*$#+,,-#.#/01,,2034567(809:;<%%=##>*7)*#C##@%4)&5A#-1;#B=)%<*$#-,,C##??DC?#?? Lights High beam lights The high beam lights can only be switched on if the ignition is turned over. the rotary control is turned to at least stage 2 (low beam lights). Switching on the high beam lights Press the lever away in the direction of travel (1).
Page 56: Interior Light
Page 57: fog lamps.
- Page 58 !"#$%&'()*$#+,,-#.#/01,,2034567(809:;<%%=##>*7)*#G##@%4)&5A#-1;#B=)%<*$#-,,C##??DC?#?? Fog lamps Switching off the rear fog lamp Turn back the rotary control by at least one stage. >Important! Turn it back by one stage only if you wish to continue driving with low beam lights Rear fog lamp Switching on the rear fog lamp The control lever for the rear fog lamp (A) Turn the rotary control to the rear fog...
Page 59: Turn Signal Lights
Page 60: warning sounds and indicator lights . 2.
- Page 61 !"#$%&'()*$#+,,-#.#/01,,2034567(809:;<%%=##>*7)*#?,##@%4)&5A#-1;#B=)%<*$#-,,C##??DC?#?? 2 10 Illuminating...
Page 62: Adjustments
Page 63: sun visors, page 64: heater/ventilation.
- Page 65 !"#$%&'()*$#+,,-#.#/01,,2034567(809:;<%%=##>*7)*#C##@%4)&5A#-1;#B=)%<*$#-,,C##??DC?#?? Heater/ventilation Air flow in the car The air flows from the nozzles set to the respective blower stages as follows: from the centre air nozzle and the rotary air nozzles (A), to the footwell (B), to the front and side windows (C). 3 4 Adjustments...
- Page 66 !"#$%&'()*$#+,,-#.#/01,,2034567(809:;<%%=##>*7)*#1##@%4)&5A#-1;#B=)%<*$#-,,C##??DC?#?? Heater/ventilation Select the upper position for fresh air Your heater and ventilation controls How to adjust the recirculated air or (A). fresh air flow > The air is drawn in from outside the Accident risk! car. You are strongly recommended to Accident risk! adhere to the heating system settings Use the recirculated air mode...
- Page 67 !"#$%&'()*$#+,,-#.#/01,,2034567(809:;<%%=##>*7)*#F##@%4)&5A#-1;#B=)%<*$#-,,C##??DC?#?? Heater/ventilation Select the lower position for Rapid cooling Rapid heating recirculated air (B). Set the Set the The air circulates e.g. when driving adjust the blower (A) to suit your blower (A) to maximum. through a tunnel in the passenger needs.
- Page 68 !"#$%&'()*$#+,,-#.#/01,,2034567(809:;<%%=##>*7)*#G##@%4)&5A#-1;#B=)%<*$#-,,C##??DC?#?? Heater/ventilation Environment! De ice and dry fogged windows before starting the engine. Allowing the engine to idle when the car is at a standstill can damage the engine and pollute the environment. Accident risk! Never drive with iced over or De icing the windows fogged windows.
Page 69: Air Conditioning Plus System
- Page 70 !"#$%&'()*$#+,,-#.#/01,,2034567(809:;<%%=##>*7)*#2##@%4)&5A#-1;#B=)%<*$#-,,C##??DC?#?? Air conditioning plus* Please observe the following notes Accident risk! before switching on the air conditioning Use the recirculated air mode plus system: only for brief periods. The windows The car's interior will cool down faster could otherwise fog over. if you do the following: The oxygen content in the passenger Discharge the warm air.
- Page 71 !"#$%&'()*$#+,,-#.#/01,,2034567(809:;<%%=##>*7)*#?,##@%4)&5A#-1;#B=)%<*$#-,,C##??DC?#?? Air conditioning plus* >Note! If the ignition or the blower is switched on again, the stored status (stages 1 3) will be reset. The air conditioning plus system switches off automatically when the engine speed is too low, when driving off, when the blower is switched off, at a coolant temperature of more than 115 °C,...
Page 72: Windscreen Wipers
- Page 73 !"#$%&'()*$#+,,-#.#/01,,2034567(809:;<%%=##>*7)*#?-##@%4)&5A#-1;#B=)%<*$#-,,C##??DC?#?? Wipers Automatic wiper control The interval times for various travel The interval time for the windscreen speeds is as follows: wipers is controlled according to the car's speed. For an increase in vehicle speed: 0 20 km/h 20 75 km/h 75 120 km/h Above 120 km/h Speed sensitive interval times...
Page 74: Rear Window Heater
Page 75: outside mirror heaters, page 76: seat heater, page 77: car cover.
- Page 78 !"#$%&'()*$#+,,-#.#/01,,2034567(809:;<%%=##>*7)*#?G##@%4)&5A#-1;#B=)%<*$#-,,C##??DC?#?? Car cover* Removing the car cover Slacken the cord. Fold the sides up onto the vehicle roof. Roll the car cover over the vehicle roof from the front to the rear. Anti theft insurance The car cover is insured against theft for a period of one year.
- Page 79 !"#$%&'()*$#+,,-#.#/01,,2034567(809:;<%%=##>*7)*#?H##@%4)&5A#-1;#B=)%<*$#-,,C##??DC?#?? 3 18 Adjustments...
Page 80: Audio
Page 81: general information, page 82: smart radio one, page 83: smart radio five, page 84: smart radio navigator.
- Page 85 !"#$%&'()*$#+,,-#.#/01,,2034567(809:;<%%=##>*7)*#F##@%4)&5A#-1;#B=)%<*$#-,,C##??DC?#?? smart radio navigator* Radio control elements a Switching device on or off g Station memory and autostore function m Automatic reverse search run b Automatic forward search function h Station memory n Scan search Scan receivable radio stations c Mute switch...
- Page 86 !"#$%&'()*$#+,,-#.#/01,,2034567(809:;<%%=##>*7)*#G##@%4)&5A#-1;#B=)%<*$#-,,C##??DC?#?? smart radio navigator* CD control elements a Switching device on or off h Contrast setting m Random play b Skip track, forward i Display of elapsed CD time, elapsed n Skip track, reverse track time and total playing time...
- Page 87 !"#$%&'()*$#+,,-#.#/01,,2034567(809:;<%%=##>*7)*#H##@%4)&5A#-1;#B=)%<*$#-,,C##??DC?#?? smart radio navigator* Navigation control elements a Switching device on or off f Menu select and confirmation of k TMC function selection b Interrupt navigation information or l Traffic congestion switch off g Back to previous menu m Intermediate stop...
Page 88: Smart Cd Changer* And Cd Box
Page 89: on board computer.
- Page 90 !"#$%&'()*$#+,,-#.#/01,,2034567(809:;<%%=##>*7)*#??##@%4)&5A#-1;#B=)%<*$#-,,C##??DC?#?? On board computer* 1. Daily readings "System" (D) menu Distance driven In the "System" menu, the Amount of fuel used language versions D, GB, F and I can be Average fuel consumption selected, Average speed date and time can be set, Amount of fuel remaining units of measurement can be specified, Operating range...
Page 91: Telephone Console* And Universal Hands Free System
Page 92: smart webmove package.
- Page 93 !"#$%&'()*$#+,,-#.#/01,,2034567(809:;<%%=##>*7)*#?C##@%4)&5A#-1;#B=)%<*$#-,,C##??DC?#?? smart webmove package* Controls A Volume control B Infrared connection C ON/OFF and background illumination D Contacts E Speaker F LED display G Antenna with compartment for pen H Start page I Telephone ON/OFF J Navigation pad K Microphone...
Page 94: Ipod
- Page 95 !"#$%&'()*$#+,,-#.#/01,,2034567(809:;<%%=##>*7)*#?F##@%4)&5A#-1;#B=)%<*$#-,,C##??DC?#?? 4 16 Audio...
Page 96: Variability
- Page 97 !"#$%&'()*$#+,,-#.#/01,,2034567(809:;<%%=##>*7)*#-##@%4)&5A#-1;#B=)%<*$#-,,C##??DC?#?? From the soft top to the open roadster From the soft top to the open roadster Danger of injury! Always carry both side rails in the designated device in the front luggage compartment. If carried unsecured in the occupant...
- Page 98 !"#$%&'()*$#+,,-#.#/01,,2034567(809:;<%%=##>*7)*#E##@%4)&5A#-1;#B=)%<*$#-,,C##??DC?#?? From the soft top to the open roadster Press the integrated retaining strip Removing the side rails Insert rail locking device on the side unlocking lever. Open the soft top until it has fully Take the rail locking device (A) out of...
- Page 99 !"#$%&'()*$#+,,-#.#/01,,2034567(809:;<%%=##>*7)*#C##@%4)&5A#-1;#B=)%<*$#-,,C##??DC?#?? From the soft top to the open roadster the side rail on the right side of the Guide the front end of the side rail Stowing the side rail vehicle (B) is mounted in the rear into the mounting receptacle in the...
- Page 100 !"#$%&'()*$#+,,-#.#/01,,2034567(809:;<%%=##>*7)*#1##@%4)&5A#-1;#B=)%<*$#-,,C##??DC?#?? From the soft top to the open roadster Locking the side rail Allow the side rail and the locking device to engage in the designated mounting receptacle. Now proceed in the same way with the second side rail. Variability 5 5...
Page 101: From Soft Top To Open Roadster
- Page 102 !"#$%&'()*$#+,,-#.#/01,,2034567(809:;<%%=##>*7)*#G##@%4)&5A#-1;#B=)%<*$#-,,C##??DC?#?? From open roadster to soft top the side rail in the front position (A) Guide the two side rail pins into the Mounting the side rails of the luggage compartment is mounted corresponding apertures (A). When mounting the side rails, ensure that on the left side of the vehicle (A).
- Page 103 !"#$%&'()*$#+,,-#.#/01,,2034567(809:;<%%=##>*7)*#H##@%4)&5A#-1;#B=)%<*$#-,,C##??DC?#?? From open roadster to soft top Locking the side rails Closing the soft top >Note! Turn the release lever at the front of Only close the soft top when the engine is Pressing a button on the remote control the side rail in the direction of travel running.
Page 104: From Hardtop* To Open Roadster
- Page 105 !"#$%&'()*$#+,,-#.#/01,,2034567(809:;<%%=##>*7)*#?,##@%4)&5A#-1;#B=)%<*$#-,,C##??DC?#?? From hardtop* to open roadster Releasing side unlocking lever Remove the hardtop halves Press the integrated retaining strip Take off the hardtop half on the on the side unlocking lever on the driver's side (A). driver's side. Release the side unlocking lever on the Swing the unlocking lever on the passenger's side.
- Page 106 !"#$%&'()*$#+,,-#.#/01,,2034567(809:;<%%=##>*7)*#??##@%4)&5A#-1;#B=)%<*$#-,,C##??DC?#?? From hardtop* to open roadster Stowing the hardtop* Stow the hardtop in the rear luggage The hardtop halves either can be stowed compartment in the designated device in the rear Danger of injury! luggage compartment or external to the Always transport both hardtop vehicle in a hardtop bag.
- Page 107 !"#$%&'()*$#+,,-#.#/01,,2034567(809:;<%%=##>*7)*#?-##@%4)&5A#-1;#B=)%<*$#-,,C##??DC?#?? From hardtop* to open roadster Fold the spacer pieces (A) downwards. Place the passenger's side hardtop half (B) in the hardtop bracket as shown. When doing this, ensure that the seals are not pressed or otherwise deformed. that the pins are completely retracted.
- Page 108 !"#$%&'()*$#+,,-#.#/01,,2034567(809:;<%%=##>*7)*#?E##@%4)&5A#-1;#B=)%<*$#-,,C##??DC?#?? From hardtop* to open roadster Open the hardtop bag*. Close the zipper of the hardtop bag. Inserting the hardtop in the hardtop bag* Insert the hardtop with the hardtop for external storage brackets into the hardtop bag. Insert both hardtop halves in the hardtop brackets as described starting on page 5 11.
Page 109: From Open Roadster To Hardtop
Page 110: notes on the soft top system.
- Page 111 !"#$%&'()*$#+,,-#.#/01,,2034567(809:;<%%=##>*7)*#?F##@%4)&5A#-1;#B=)%<*$#-,,C##??DC?#?? 5 16 Variability...
Page 112: Child Friendly
Page 113: child restraint systems.
- Page 114 !"#$%&'()*$#+,,-#.#/01,,2034567(809:;<%%=##>*7)*#E##@%4)&5A#-1;#B=)%<*$#-,,C##??DC?#?? Child restraint systems* What you must note when transporting Danger of injury! On child restraint systems that do not children! It will not be possible to fit the have their own belt system, the seat belts correctly on children under shoulder belt of the car's built in Danger of injury! 150 centimetres tall or under 12 years...
- Page 115 You should therefore have restraint particularly if the child is in the If you have installed an original smart systems and fastenings that have been immediate vicinity of the passenger's baby carrier on the passenger's seat damaged or subjected to loads in an airbag at the time of its activation.
Page 116: Using Child Restraint Systems
Page 117: recommended child restraint systems, page 118: on the move, page 119: before driving off.
- Page 120 !"#$%&'()*$#+,,-#.#/01,,2034567(809:;<%%=##>*7)*#E##@%4)&5A#-1;#B=)%<*$#-,,C##??DC?#?? Before driving off Gearshifts Automated shifting (softouch)* Gearshifts from the steering wheel* You change gear in your car in various Shifting between the gears occurs The 3 spoke leather wrapped sports ways, depending on its specification: automatically when the gearshift lever is steering wheel with shifting capability* in the gearshift plane and you press allows you to shift gears without taking...
Page 121: Driving
- Page 122 !"#$%&'()*$#+,,-#.#/01,,2034567(809:;<%%=##>*7)*#1##@%4)&5A#-1;#B=)%<*$#-,,C##??DC?#?? Driving How to deactivate the electronic immobiliser: Turn the ignition key back to position 0. Press pushbutton on the ignition key. If you have an infrared remote control, you need to aim at the inside rearview mirror. > A single beeper tone indicates that the electronic immobiliser is deactivated.
- Page 123 !"#$%&'()*$#+,,-#.#/01,,2034567(809:;<%%=##>*7)*#F##@%4)&5A#-1;#B=)%<*$#-,,C##??DC?#?? Driving Starting the engine Danger of poisoning! Never run the engine in enclosed spaces. The exhaust emissions contain carbon monoxide. Breathing in exhaust emissions can severely damage your health, resulting in a loss of consciousness or even death. Accident risk! Fasten your seat belt.
- Page 124 Call a breakdown recovery service such as smartmove Assistance or a qualified specialist workshop such as a smart center. >Note! If a is shown on the gear indicator, the electronic immobiliser must first be deactivated (see page 7 5).
- Page 125 !"#$%&'()*$#+,,-#.#/01,,2034567(809:;<%%=##>*7)*#H##@%4)&5A#-1;#B=)%<*$#-,,C##??DC?#?? Driving >Note! >Important! If a 0 appears on the gear indicator, this If you open the driver's door before 0.7 of indicates that a gear has not yet been a second has elapsed, engaged. The footbrake was not applied the hill start assist system is switched while moving the lever in the gearshift off.
- Page 126 !"#$%&'()*$#+,,-#.#/01,,2034567(809:;<%%=##>*7)*#2##@%4)&5A#-1;#B=)%<*$#-,,C##??DC?#?? Driving Reversing the car >Note! Apply the footbrake. Engage the reverse gear only when the Shift the gearshift lever out of position car is at a standstill. N and pull it back to position R. > An R appears in the gear indicator. Release the footbrake.
- Page 127 !"#$%&'()*$#+,,-#.#/01,,2034567(809:;<%%=##>*7)*#?,##@%4)&5A#-1;#B=)%<*$#-,,C##??DC?#?? Driving >Notes on shifting! When coming to a stop, e. g. at traffic lights, the car will automatically select 1st gear. The car will automatically shift up a gear once you reach the engine speed limit. Environment! To save energy and protect the environment, shift up in good time, as soon as you are requested to do so in the Briefly press the gearshift lever or the...
- Page 128 !"#$%&'()*$#+,,-#.#/01,,2034567(809:;<%%=##>*7)*#??##@%4)&5A#-1;#B=)%<*$#-,,C##??DC?#?? Driving Kick down function Vehicles with softouch* or vehicles with cruise control*: Use the kick down function when you want maximum acceleration. Depress the accelerator past the pressure point. > The transmission downshifts. Take your foot slightly off the accelerator once you have reached the desired speed.
- Page 129 !"#$%&'()*$#+,,-#.#/01,,2034567(809:;<%%=##>*7)*#?-##@%4)&5A#-1;#B=)%<*$#-,,C##??DC?#?? Driving Parking Accident risk! Do not park the car with the Accident risk! engine running and a gear engaged. When you stop the car on a hill or This could allow the car to set itself in park it, it must be secured additionally motion and cause an accident.
Page 130: Driving In The Winter
Page 131: driving with the catalytic converter 7, page 132: driving notes.
- Page 133 9. The perfect setting Have your car checked regularly by a qualified specialist workshop, e.g. in a smart center. Do not exceed the scheduled service intervals. Environment! You will save energy and help to protect the environment if you refrain...
Page 134: Cruise Control
- Page 135 !"#$%&'()*$#+,,-#.#/01,,2034567(809:;<%%=##>*7)*#?H##@%4)&5A#-1;#B=)%<*$#-,,C##??DC?#?? Cruise control* >Note! The driving speed set using the ring switch also can be stored by turning towards To activate the cruise control Altering speed selected via the cruise Bring your car up to the desired speed. control Turn the ring switch towards The set driving speed can be changed with >...
- Page 136 !"#$%&'()*$#+,,-#.#/01,,2034567(809:;<%%=##>*7)*#?2##@%4)&5A#-1;#B=)%<*$#-,,C##??DC?#?? Cruise control* Deactivating the cruise control The cruise control is switched off: when braking. when the esp system is in operation. when the control lever is pressed one time. The driving speed last set with the cruise control is stored. >Note! The speed last memorised is erased when you turn off the engine.
Page 137: Speed Limiter
- Page 138 !"#$%&'()*$#+,,-#.#/01,,2034567(809:;<%%=##>*7)*#-?##@%4)&5A#-1;#B=)%<*$#-,,C##??DC?#?? Speed limiter* Driving with a speed limiter You can accelerate your vehicle up to the set speed limit. The engine is governed as soon as it reaches the upper limit. Exceeding the specified limit speed The specified speed limit may be exceeded if the car is accelerated while travelling downhill,...
- Page 139 !"#$%&'()*$#+,,-#.#/01,,2034567(809:;<%%=##>*7)*#--##@%4)&5A#-1;#B=)%<*$#-,,C##??DC?#?? Speed limiter* Switching off the speed limiter Press the control lever for 2 seconds. > The speed limiter is now switched off. > The cruise control is switched on. Reactivating the speed limit >Note! You can reactivate the speed limit at any The last speed selected for the speed driving speed.
Page 140: Brakes
- Page 141 Make sure that the engine is running whenever the vehicle is rolling. Have the brake system repaired by a qualified specialist workshop, e.g. a smart center, if there is a fault in the brake system. 7 24 On the move...
- Page 142 Braking using abs if you drive too close to the vehicle smart center. In emergency situations: in front. Hydraulic brake assistant Quickly depress the brake pedal as...
- Page 143 In cases 1 and 2 you have to leave it. Take the car to a qualified specialist Do not drive any further. workshop, e.g. a smart center, without Call a breakdown recovery service delay. such as smartmove Assistance or a qualified specialist workshop such as a smart center.
Page 144: Electronic Stability Program (Esp)
- Page 145 !"#$%&'()*$#+,,-#.#/01,,2034567(809:;<%%=##>*7)*#-H##@%4)&5A#-1;#B=)%<*$#-,,C##??DC?#?? Electronic Stability Program (esp) When should you switch esp off? >Notes on driving with esp switched off esp is unable to stabilise the car while it is Accident risk! accelerating or coasting. If the esp indicator light in the All esp functions are available during speedometer comes on, esp is switched braking manoeuvres.
Page 146: Airbags
- Page 147 Do not place any objects on the the work involved. smart gmbh the dust is harmless. airbags or between the airbags and recommends that you visit a smart The inflated airbag slows and reduces the occupants. center for this. It is particularly the movement of the occupant.
- Page 148 This fine powder is have been tested for cars built by smart injuries to the head or thorax. The front entirely harmless; its smoky gmbh and have a designated tear seam...
- Page 149 The passenger's airbag is only deactivated when you fit an original smart baby carrier to the passenger's seat. 7 32 On the move...
- Page 150 The side airbag is only deactivated independently of the front airbags when you fit a special smart baby being deployed, carrier to the passenger's seat. independently of the belt tensioner,...
- Page 151 15 seconds. seat recognition system (airbag particularly if the child is in the > A smart baby carrier (original warning). immediate vicinity of the passenger's smart accessory) was identified on Do not sit on the front passenger's seat;...
- Page 152 (restraint system not workshop. smart gmbh recommends that identified), have the automatic you visit a smart center for this. It is restraint system recognition function particularly important to have safety checked without delay by a qualified...
Page 153: Parking Assist
- Page 154 !"#$%&'()*$#+,,-#.#/01,,2034567(809:;<%%=##>*7)*#EG##@%4)&5A#-1;#B=)%<*$#-,,C##??DC?#?? Parking assist* >Important! When parking, pay special attention to obstacles with a height less than 30 cm or overhangs over 100 cm, such as flower pots or ramps. These obstacles cannot be detected and you could damage the vehicle or the objects themselves. Ultrasound sources, such as the air brake system of heavy goods vehicles or a pneumatic hammer, can interfere with the...
- Page 155 !"#$%&'()*$#+,,-#.#/01,,2034567(809:;<%%=##>*7)*#EH##@%4)&5A#-1;#B=)%<*$#-,,C##??DC?#?? 7 38 On the move...
Page 156: Loading Up
Page 157: storage compartments and trays.
- Page 158 !"#$%&'()*$#+,,-#.#/01,,2034567(809:;<%%=##>*7)*#E##@%4)&5A#-1;#B=)%<*$#-,,C##??DC?#?? Storage compartments and trays The 12 volt power socket serves as a Please note that power supply for the following when the the 12 volt power socket is only rated ignition is switched on: to handle a permanent load of the cigarette lighter, in conjunction 5 amperes (60 W).
- Page 159 !"#$%&'()*$#+,,-#.#/01,,2034567(809:;<%%=##>*7)*#C##@%4)&5A#-1;#B=)%<*$#-,,C##??DC?#?? Storage compartments and trays Danger of injury! Make sure that any objects placed in the drinks holder are always secure while the car is moving. Unsecured objects in the drinks holder could otherwise be thrown around and injure you and others if you brake sharply, change direction suddenly, are involved in an accident.
- Page 160 !"#$%&'()*$#+,,-#.#/01,,2034567(809:;<%%=##>*7)*#1##@%4)&5A#-1;#B=)%<*$#-,,C##??DC?#?? Storage compartments and trays Securing the luggage net Danger of injury! The luggage net may only be secured in the passenger's footwell. If the net is stored elsewhere, it can land in the driver's footwell, block operation of the pedals and lead you to cause an accident.
- Page 161 !"#$%&'()*$#+,,-#.#/01,,2034567(809:;<%%=##>*7)*#F##@%4)&5A#-1;#B=)%<*$#-,,C##??DC?#?? Storage compartments and trays Securing the storage bag Danger of injury! Do not transport unsecured heavy Danger of injury! or hard objects in the passenger The storage bag may only be compartment. Unsecured objects in the secured in the passenger's footwell. passenger compartment could If the bag is stored elsewhere, it can otherwise be thrown around and injure...
- Page 162 !"#$%&'()*$#+,,-#.#/01,,2034567(809:;<%%=##>*7)*#G##@%4)&5A#-1;#B=)%<*$#-,,C##??DC?#?? Storage compartments and trays Danger of injury! Do not transport unsecured heavy or hard objects in the passenger compartment. Unsecured objects in the passenger compartment could otherwise be thrown around and injure you and others if you brake sharply, change direction suddenly, are involved in an accident.
- Page 163 !"#$%&'()*$#+,,-#.#/01,,2034567(809:;<%%=##>*7)*#H##@%4)&5A#-1;#B=)%<*$#-,,C##??DC?#?? Luggage compartment, front and rear Luggage compartment, front and rear Danger of injury! Do not transport unsecured and heavy objects in the interior or luggage compartment. Unsecured objects in the luggage compartment could otherwise be thrown around and injure you and others if you brake sharply, change direction suddenly, are involved in an accident.
- Page 164 !"#$%&'()*$#+,,-#.#/01,,2034567(809:;<%%=##>*7)*#2##@%4)&5A#-1;#B=)%<*$#-,,C##??DC?#?? Luggage compartment, front and rear Closing the tailgate Danger of injury! When closing the tailgate, make sure that no one is trapped. Pull down the tailgate and close it firmly. Opening the tailgate Opening with the unlocking button Press button (B) on the switch strip. Danger of poisoning! >...
- Page 165 !"#$%&'()*$#+,,-#.#/01,,2034567(809:;<%%=##>*7)*#?,##@%4)&5A#-1;#B=)%<*$#-,,C##??DC?#?? Luggage compartment, front and rear Emergency release of the tailgate The emergency release for opening the tailgate is located behind the driver's seat. Slide the driver's seat all the way to the front. Pull up the stamped section of the floor carpeting as shown.
Page 166: Rear Bag
- Page 167 !"#$%&'()*$#+,,-#.#/01,,2034567(809:;<%%=##>*7)*#?-##@%4)&5A#-1;#B=)%<*$#-,,C##??DC?#?? Rear bag* Danger of injury! Do not store any long, sharp, fragile or heavy objects such as bottles in the rear bag. Such objects cannot be adequately secured here; during an accident or an emergency braking manoeuvre, they can be hurtled out of the rear bag and injure occupants or become destroyed.
Page 168: Multifunction Box* (Only Roadster Coupé)
Page 169: luggage compartment cover for roadster coupé.
- Page 170 !"#$%&'()*$#+,,-#.#/01,,2034567(809:;<%%=##>*7)*#?1##@%4)&5A#-1;#B=)%<*$#-,,C##??DC?#?? Luggage compartment for roadster coupé* Engage the ends of the cross rail into the receptacles in the luggage compartment trim. >Note! If objects are placed on the luggage compartment cover when mounted, the cover may be damaged. Loading up 8 15...
Page 171: Rear Luggage Rack
Page 172: loading guidelines.
- Page 173 !"#$%&'()*$#+,,-#.#/01,,2034567(809:;<%%=##>*7)*#?H##@%4)&5A#-1;#B=)%<*$#-,,C##??DC?#?? Loading guidelines You must observe the following: Accident risk! Danger of injury! Your car's handling characteristics The permissible gross vehicle Objects on the passenger's seat are dependent upon the load weight and the permissible axle load should always be secured in such a way distribution.
Page 174: Routines
Page 175: refuelling.
- Page 176 !"#$%&'()*$#+,,-#.#/01,,2034567(809:;<%%=##>*7)*#E##@%4)&5A#-1;#B=)%<*$#-,,C##??DC?#?? Refuelling >Note! Danger of poisoning! If you wish to fill the fuel tank to its Keep children away from fuel. If maximum level, any fuel is swallowed, consult a doctor wait for a period of 30 seconds after immediately. the first switch off, then start filling the tank with the fuel Switch both the engine and ignition...
Page 177: Engine Oil Level
- Page 178 !"#$%&'()*$#+,,-#.#/01,,2034567(809:;<%%=##>*7)*#1##@%4)&5A#-1;#B=)%<*$#-,,C##??DC?#?? Engine oil level Reinsert the dipstick. Checking engine oil level Wait for at least one minute. Wait a few minutes until the oil has Pull the dipstick out again. settled. > The oil level must lie between the Open the rear luggage compartment. markings MIN and MAX on both sides Fold the carpet back (A).
- Page 179 !"#$%&'()*$#+,,-#.#/01,,2034567(809:;<%%=##>*7)*#F##@%4)&5A#-1;#B=)%<*$#-,,C##??DC?#?? Engine oil level Check the engine oil level again. If your car has too little engine oil You must top up the engine oil! Screw the cap on tightly in the Unscrew the cap. clockwise direction. Fire hazard! Use a funnel to top the engine oil up. Slide the engine compartment covers When topping up the engine oil, When the MIN oil level is reached, top...
- Page 180 Choosing the right type of oil Engine oil viscosity One drop of oil will contaminate Use only oils approved by smart gmbh The SAE class (viscosity) has to be chosen 1,000 litres of water. (acc. to MB sheet 229.5). The MB sheet...
Page 181: Checking Operating Fluids
- Page 182 !"#$%&'()*$#+,,-#.#/01,,2034567(809:;<%%=##>*7)*#2##@%4)&5A#-1;#B=)%<*$#-,,C##??DC?#?? Checking fluids Determining the coolant level >Note! Topping up coolant Open the rear luggage compartment. Warm coolant expands, which is why it Let the radiator cool down for at least Fold the carpet back (A). may extend beyond the maximum filling 30 minutes.
- Page 183 !"#$%&'()*$#+,,-#.#/01,,2034567(809:;<%%=##>*7)*#?,##@%4)&5A#-1;#B=)%<*$#-,,C##??DC?#?? Checking fluids Open the front luggage compartment. Pull up the reservoir cap at the tab. Fire hazard! Windscreen wash concentrate is > You can now add washer fluid. highly inflammable. When handling the >Note! concentrate, avoid smoking, fire or In order to clean the windscreen naked flames.
- Page 184 Look down into the reservoir for a mark, take your car to a qualified brakes are subjected to high loads visual check. specialist workshop, e.g. a smart (e.g. when driving down mountain > The fluid level must lie between the center.
Page 185: Tyre Inflation Pressure
- Page 186 !"#$%&'()*$#+,,-#.#/01,,2034567(809:;<%%=##>*7)*#?E##@%4)&5A#-1;#B=)%<*$#-,,C##??DC?#?? Tyre inflation pressure Check the tyre inflation pressure before >Note! the start of your journey. There is a table Tyre inflation pressures change by about showing the tyre inflation pressure on 0.1 bar per 10 °C change in the air your car's fuel filler flap.
- Page 187 !"#$%&'()*$#+,,-#.#/01,,2034567(809:;<%%=##>*7)*#?C##@%4)&5A#-1;#B=)%<*$#-,,C##??DC?#?? Tyre inflation pressure Checking the tyre inflation pressure >Important! Allow the tyres to cool down. The protective cap protects the valve Unscrew the valve protective cap (A). against dirt and leakage. Check the tyre pressure (B). > The tyre inflation pressure values are printed on the inside of the filler cap and in the table below.
Page 188: Wiper Blades
Page 189: adjusting the wiper nozzles, page 190: care notes.
- Page 191 !"#$%&'()*$#+,,-#.#/01,,2034567(809:;<%%=##>*7)*#?H##@%4)&5A#-1;#B=)%<*$#-,,C##??DC?#?? Care notes Washing the car Removing tar Removing insects Remove any tar marks before washing the Things you should watch out for before Remove insects before you start to wash the car. car. washing your car! Remove caked on grime such as Use the smartcare insect remover Apply the tar remover with a damp dead insects, bird droppings and...
- Page 192 !"#$%&'()*$#+,,-#.#/01,,2034567(809:;<%%=##>*7)*#?2##@%4)&5A#-1;#B=)%<*$#-,,C##??DC?#?? Care notes Washing your car by hand Accident risk! Wash your car using car shampoo After washing the car, the brakes concentrate and a sponge. may still be wet and thus their Rinse the car with clear water functionality impaired. Therefore, afterwards.
- Page 193 The smartcare touch up paint sticks can a garage or under a tree), be obtained in a qualified specialist the season and workshop, e.g. a smart center. weather and environmental influences. Exterior Repair options Plastic body panels with clearcoat paint...
- Page 194 !"#$%&'()*$#+,,-#.#/01,,2034567(809:;<%%=##>*7)*#-?##@%4)&5A#-1;#B=)%<*$#-,,C##??DC?#?? Care notes All care products are available as smartcare products from a qualified specialist workshop, e.g. a smart center. Interior Special Lightly soiled Heavily soiled, Never do the considerations Manual/automatic manual/automatic following car washes car washes Cloth upholstery in the...
- Page 195 !"#$%&'()*$#+,,-#.#/01,,2034567(809:;<%%=##>*7)*#--##@%4)&5A#-1;#B=)%<*$#-,,C##??DC?#?? Care notes All care products are available as smartcare products from a qualified specialist workshop, e.g. a smart center. Exterior Special Lightly soiled Heavily soiled, Never do the considerations Manual/automatic manual/automatic following car washes car washes tridion safety cell,...
Page 196: Helpful Hints
Page 197: on board diagnosis socket (obd), page 198: fuses.
- Page 199 !"#$%&'()*$#+,,-#.#/01,,2034567(809:;<%%=##>*7)*#C##@%4)&5A#-1;#B=)%<*$#-,,C##??DC?#?? Fuses Fuse box, front Fuse box, rear 10 4 Helpful hints...
- Page 200 !"#$%&'()*$#+,,-#.#/01,,2034567(809:;<%%=##>*7)*#1##@%4)&5A#-1;#B=)%<*$#-,,C##??DC?#?? Fuses Fuse assignment Consumers Amperage Colour Starter 25 A Neutral Windscreen wipers, washer pump 20 A Yellow Heater blower, seat heater 20 A Yellow Power windows, l. & r. 30 A Green Light switch 7.5 A Brown Parking lights/tail lights, r. 7.5 A Brown Parking lights/tail lights, l.
- Page 201 !"#$%&'()*$#+,,-#.#/01,,2034567(809:;<%%=##>*7)*#F##@%4)&5A#-1;#B=)%<*$#-,,C##??DC?#?? Fuses Consumers Amperage Colour Rear window wiper 15 A Blue Airbag triggering device, esp 7.5 A Brown Mirror adjustment 7.5 A Brown Radio, CD, instrument cluster, tachometer, OBD, backup lamp 15 A Blue Power socket 15 A Blue Low beam light, r. 7,5 A Brown Low beam light, l.
- Page 202 !"#$%&'()*$#+,,-#.#/01,,2034567(809:;<%%=##>*7)*#G##@%4)&5A#-1;#B=)%<*$#-,,C##??DC?#?? Fuses Consumers Amperage Colour esp pump 50 A Power steering 30 A Green Backup fuse 15 Backup fuse 15 (W450, glass sliding roof) 15 A Backup fuse 15 Backup fuse 15 Backup fuse 30 Backup fuse 30 Backup fuse 30 Backup fuse 30 25 A Backup fuse 30, seat heater...
Page 203: Bulbs
- Page 204 !"#$%&'()*$#+,,-#.#/01,,2034567(809:;<%%=##>*7)*#2##@%4)&5A#-1;#B=)%<*$#-,,C##??DC?#?? Bulbs Turn the holder anticlockwise to How to change the taillight Changing the third brake light remove it from the housing. Each taillight consists of: Loosen and remove the retaining > The plug connection remains in the Bulb, turn signal 12 V 21 W screws (A).
Page 205: Breakdown Set
- Page 206 Consult a doctor immediately if any Notify a qualified specialist allergic reactions occur. workshop, e.g. a smart center. Keep the tyre sealant away from children. If the tyre sealant has been swallowed, thoroughly rinse mouth immediately and drink plenty of water.
- Page 207 !"#$%&'()*$#+,,-#.#/01,,2034567(809:;<%%=##>*7)*#?-##@%4)&5A#-1;#B=)%<*$#-,,C##??DC?#?? Breakdown set* Remove the dust cap from the valve. Repairing tyres with the aid of the Unscrew the valve insert using the breakdown kit enclosed valve remover. Shake the tyre sealant bottle before use. >Note! Take care to protect the valve insert against contamination.
- Page 208 !"#$%&'()*$#+,,-#.#/01,,2034567(809:;<%%=##>*7)*#?E##@%4)&5A#-1;#B=)%<*$#-,,C##??DC?#?? Breakdown set* Remove the stopper from the filler hose Screw the original valve insert (or the Fit the compressor's air hose and push the end of the hose onto the replacement one if necessary) back accurately onto the valve. tyre valve.
- Page 209 You Notify a qualified specialist the tyre sealant is distributed evenly could cause an accident as a result. workshop, e.g. a smart center. around the tyre's interior and can seal Notify a qualified specialist the damaged point.
- Page 210 4 mm (1/8 in) or away from the the compressor. Carefully drive to the tyre's tread. The manufacturer is not next qualified specialist workshop, liable for damage sustained through e.g. a smart center. improper use of the breakdown kit. Helpful hints 10 15...
Page 211: Wheel Theft Protection
Page 212: tyres and wheels.
- Page 213 A tyre specialist shop or a qualified between the front and rear axles (RF to replaced without fail. specialist workshop, such as a smart RR; LF to LR). Change the tyres after no later than six center, will be able to supply further Fit new tyres on the rear wheels.
- Page 214 You should measure the tread depth with a accident and injure yourself or others. indicating the tyre's week of production tread depth gauge, available from a (WWYY). qualified specialist workshop such as a smart center. Helpful hints 10 19...
- Page 215 !"#$%&'()*$#+,,-#.#/01,,2034567(809:;<%%=##>*7)*#-,##@%4)&5A#-1;#B=)%<*$#-,,C##??DC?#?? Tyres and wheels Tyre damage Interchanging wheels Accident risk! Tyre damage may be caused e.g. by: Driving over curbs or sharp Accident risk! the vehicle's operating conditions, edged objects can cause damage to the Only interchange the front and curbs, tyre's carcass that is not externally rear wheels if they are of the same...
- Page 216 It is particularly failure.
- Page 217 !"#$%&'()*$#+,,-#.#/01,,2034567(809:;<%%=##>*7)*#--##@%4)&5A#-1;#B=)%<*$#-,,C##??DC?#?? Tyres and wheels Park the car on a level surface. Accident risk! Apply the handbrake. The jack is intended to lift the Press the brake pedal and move the car off the ground for short spells only, softip gearshift control to position R. when changing a wheel.
- Page 218 Use only the designated wheel studs for the wheel and car. For safety reasons, smart gmbh recommends using only the wheel studs approved by smart gmbh. Other studs could work loose. Helpful hints 10 23...
- Page 219 >Note! If the newly mounted wheels exhibit any imbalance, have this checked and rectified by a qualified specialist workshop, e.g. a smart center. Accident risk! Have the tightening torque checked immediately after changing a wheel. The wheels could otherwise work loose if they are not tightened to a torque of 120 Nm.
Page 220: Battery
- Page 221 Hand any spent, faulty or damaged ignite the highly explosive gas batteries in to a qualified specialist mixture generated by the battery. You workshop, e.g. a smart center, or to a and others could sustain serious collection point for spent batteries. injuries as a result.
- Page 222 !"#$%&'()*$#+,,-#.#/01,,2034567(809:;<%%=##>*7)*#-G##@%4)&5A#-1;#B=)%<*$#-,,C##??DC?#?? Battery Remove the battery mount (A). Installing and removing the battery Removing the battery Remove the battery. Make sure that Switch off the engine. you do not mix up the terminal clips. Switch off all electrical consumers. Installing the battery The battery could otherwise be Open the front luggage compartment.
- Page 223 Disconnect the car's battery for specialist workshop, e.g. a smart extended periods of non use and center. recharge approximately every six The battery stoppers on the top must be months.
- Page 224 Assistance or a vehicle. qualified specialist workshop, Open the front luggage compartment. such as a smart center. (see page 8 8) Jump starting Turn the four retaining screws If your battery is flat and the car will not anticlockwise to remove.
- Page 225 Do not switch the lights on! > This helps reduce the danger of any these are available from a qualified sparking when removing the jumper workshop, such as a smart center. cables. The vehicles must not touch each other Start by removing the jumper cable during starting attempts.
- Page 226 While the battery is being charged, the qualified specialist workshop, e.g. a deflagration, causing damage to oxyhydrogen gas generated by the smart center. The housing could be paintwork or corrosion on the vehicle battery represents an explosion risk. damaged. and ultimately injuring you and others.
Page 227: Roll Starting
Page 228: towing.
- Page 229 !"#$%&'()*$#+,,-#.#/01,,2034567(809:;<%%=##>*7)*#EC##@%4)&5A#-1;#B=)%<*$#-,,C##??DC?#?? Towing Accident risk! Have the car towed away with a tow bar if the engine cannot be started. If the engine cannot be started, there is no power assistance for the electric power steering system*. You will then need to use considerably more effort to steer and brake the car.
- Page 230 Ideally, you should have your car towed The car should only be towed or tow by a vehicle from a qualified another vehicle by means of the towing specialist workshop, such as a smart lug. center. The towed vehicle may not be heavier Observe the national statutory than the towing vehicle.
Page 231: Fire Extinguisher
Page 232: data transfer.
- Page 233 !"#$%&'()*$#+,,-#.#/01,,2034567(809:;<%%=##>*7)*#-##@%4)&5A#-1;#B=)%<*$#-,,C##??DC?#?? Information signs (example: left hand drive version) Information signs (example: left hand drive version) a smartmove Assistance (glove box) b Airbag information signs (sun visor/roof rail) c Model plate with vehicle ident. no. (B post on passenger side) d Refuelling sign (on inside of filler flap) e Anti theft wheel studs information sign Danger of injury! Various warning labels are attached to your...
Page 234: Model Plate
Page 235: technical data.
- Page 236 EC Directive 1999/ higher than the values determined and Any qualified specialist workshop such as a smart center will be able to provide 100/EC cited in the EC guidelines (1999/100/EC), further details. The following data were evaluated in...
- Page 237 !"#$%&'()*$#+,,-#.#/01,,2034567(809:;<%%=##>*7)*#F##@%4)&5A#-1;#B=)%<*$#-,,C##??DC?#?? Technical data Acceleration/maximum speed Petrol engines 45 kW 60 kW 74 kW 74 kW roadster roadster roadster roadster roadster roadster roadster roadster coupé coupé coupé coupé BRABUS BRABUS Acceleration, flexibility in 5th gear 0 to 100 km/h (s) 15.5 15.5...
- Page 238 7J x 16 ET 20 8J x 17 ET 15 8J x 17 ET 15 1 Also applies for the 74 kW roadster. 2 Also applies for the 74 kW roadster coupé. >Note! Freedom of motion can only be guaranteed if the manufacturer's recommended wheels and tyres are used.
- Page 239 >Notes on the use of non original smart snow chains Accident risk! Accident risk! If other make snow chains are used:...
- Page 240 1 Curb weight (acc. to 92/21/EEC) including driver (75 kg) and all fluids (tank 90 % full). Optional extras will increase the curb weight; as a result the payload is reduced. 2 Also applies for the 74 kW roadster. 3 Also applies for the 74 kW roadster coupé. roadster, roadster coupé, Loads BRABUS roadster and BRABUS roadster coupé...
- Page 241 1357/1392 1357/1392 1365/1382 1365/1382 Luggage compartment, front/rear 59/86 59/189 59/86 59/189 (ltrs.) Turning circle, m (ft/in) 10.7 10.7 10.7 10.7 1 Also applies for the 74 kW roadster. 2 Also applies for the 74 kW roadster coupé. 11 10 Reference...
- Page 242 !"#$%&'()*$#+,,-#.#/01,,2034567(809:;<%%=##>*7)*#??##@%4)&5A#-1;#B=)%<*$#-,,C##??DC?#?? Technical data Refuelling Fuel tank for all vehicles Capacity, (ltrs.) of which reserve capacity (ltrs.) Fuel 45 kW Premium unleaded petrol, EN 228, at least 95 RON/85 MON 60 kW Unleaded premium super, EN 228, at least 98 RON /88 MON 74 kW Unleaded premium super, EN 228,...
- Page 243 !"#$%&'()*$#+,,-#.#/01,,2034567(809:;<%%=##>*7)*#?-##@%4)&5A#-1;#B=)%<*$#-,,C##??DC?#?? Technical data smart roadster, roadster coupé, Fluid capacities BRABUS smart roadster and BRABUS roadster coupé Coolant system Coolant capacity, l (Imp. pints) Anti corrosion agent/anti freeze (ltrs.) Windscreen washer system Total fluid capacity (ltrs.) Tyre inflation pressure (summer and...
- Page 244 (EC Directive 95/ designated by means of an e symbol.
Page 245: Homologation Numbers
Page 246: official homologation.
- Page 247 !"#$%&'()*$#+,,-#.#/01,,2034567(809:;<%%=##>*7)*#?F##@%4)&5A#-1;#B=)%<*$#-,,C##??DC?#?? 11 16 Reference...
- Page 248 !"#$%&'()*$#+,,-#.#/01,,2034567(809:;<%%=##>*7)*#?##@%4)&5A#-1;#B=)%<*$#-,,C##??DC?#?? >>Key word index.
- Page 249 !"#$%&'()*$#+,,-#.#/01,,2034567(809:;<%%=##>*7)*#-##@%4)&5A#-1;#B=)%<*$#-,,C##??DC?#?? Key word index Belt guide .........1 13, 1 19 Cockpit, left hand drive model ..1 23 Belt tensioners........1 21 Cockpit, right hand drive model..1 24 abs ............. 7 25 Boost pressure display* ....1 43 Coming home function*......2 2 abs indicator light ....
- Page 250 Headlight flashers........2 9 Luggage compartment cover esp indicator light......1 28 Heater ..........3 3 for the roadster coupé* ....8 14 High beam indicator light ....1 30 Luggage net......... 8 5 High beam lights........2 4 Luggage net bag* ........ 8 5 Horn............2 9...
- Page 251 Parking lights ........2 2 smart radio five*........4 4 with convenience touch shifting..2 8 Passenger's airbag ......7 31 smart radio navigator* ......4 5 Tyre condition ......... 10 19 Power windows ........1 16 smart radio one* ........4 3 Tyre damage ........
- Page 252 !"#$%&'()*$#+,,-#.#/01,,2034567(809:;<%%=##>*7)*#1##@%4)&5A#-1;#B=)%<*$#-,,C##??DC?#?? Key word index Xenon headlights* ....... 2 5 1,2,3 ... 12 volt power socket ......8 3 3 spoke leather wrapped sports steering wheel ......7 3 Key word index 12 5...
- Page 253 !"#$%&'()*$#+,,-#.#/01,,2034567(809:;<%%=##>*7)*#F##@%4)&5A#-1;#B=)%<*$#-,,C##??DC?#?? Masthead Publisher and copyright smart gmbh Concept and execution cognitas GmbH Layout and typesetting cognitas GmbH Translation indubo translation solutions GmbH & Co. KG Print Sommer Corporate Media AG...
- Page 258 !"#$%&'()*$#+,,-#.#/01,,2034567(809:;<%%=##>*7)*#-##?%4)&5@#-1;#A=)%<*$#-,,B##CCD-E#CC www.smart.com smart a brand of DaimlerChrysler...
This manual is also suitable for:
Rename the bookmark, delete bookmark, delete from my manuals, upload manual.
- Roadster Types
- Buyers Guide
- Production Line
- V6 Production
- Parts Guide
- Gearbox Explained
Downloadable version - click here. So, you’re thinking of buying a Smart Roadster? Excellent, you’ve made the right choice, you won’t be disappointed. Consult the information on each model (using the above links) to make sure you know which model is which before looking at any!
I’m not a car mechanic. I do not claim to be an expert on Smart roadsters! I have put together this buyer’s guide from information I have collected from other enthusiasts and specialists. Use it as a rough guide to checking out a potential car purchase. It is by no means an extensive check list, and I can not be held responsible for the way in which you use this information. Buying a particular car is entirely your decision of which I am not responsible!
WARRANTY: All new roadsters came with a two year warranty, which is not a great deal by todays standards. Older cars purchased through a dealer network may come with a third party warranty, read the small print and check to see what exactly is covered, some policies are better than others. Check that it specifically covers water damage to the electrics, although roadsters can be sealed!
WINDOWS: Check all windows for scratches or chips. The front windscreen is not heated, so although not the most expensive screen to replace, it will still cost a fair amount to do so. The side rear glass on the coupe is plastic, servicing can mean it needs to be removed, so make sure it is not scratched. Check the wiper blades are not low, not expensive but a sign of a cared for car! Electric windows should operate smoothly up and down, no jitters.
PAINT WORK : All roadsters are going to look clean and shiny! They have plastic panels, painted, and lacquered. Check that there are no deep scratches, also check the lacquer is not peeling. Replacement panels would need to be painted to match the car. Look around the rear wheel arches, there are often stone chips there, it is not a big deal but might be taken into account when negotiating a price.
Note: My black roadster Brabus coupe rear wing has faded to grey, it’s even, so I don’t believe it’s sun burn. It seems to be a common fault. At a large meeting I saw several black roadsters with faded panels, the tridion no longer colour matched, and yet the tridion hadn’t faded. I have also witnessed yellow roadsters in three different shades! So they fade too. I guess the thing to do is just look and see if the colour is even all round. My car looks bad now, hopefully Smart will sort it out under warranty.
DOORS : Make sure both open from the inside and the outside. And both lock. It is quite common for a catch inside the door to come loose and not permit the door to be opened.
FRONT BOOT: Lift the front trunk liner out (undoing the retaining screws with a coin) and see what surprises are in store - probably nothing, but it's worth a look. The battery is under there, batteries are usually designed to last three years, some longer. Check the connectors on the horn (passenger side), they have a habit of going rusty and stopping the horn working.
STEERING RACK: While you are under the front boot liner, check the steering rack. It should be tight with no movement, if you can lift it by holding the steering column then it will be in need of attention.
SUSPENSION :
You need to check the front springs for corrosion. I've seen several reports of these broken on Smart user forums. I believe it may only apply to earlier models. If you could take the wheels off it would be easier to see!
On the left, front spring shown in place on a Brabus with the wheel removed. These ones are fine. And a piece fallen off one that has corroded.
BRAKES : Roadsters should stop on a sixpence, just make sure there is no pulling to the sides. Some drivers do report that the brake pedal feels a bit spongy, that is just a roadster characteristic! Depending on the wheels fitted you might be able to see the wear on the brake pads, and also the wear on the disks. Even a low mileage model can have a damaged disk, mine had just 10,000 miles on the clock when a disk was scored by a stone stuck between the brake pad and disk. Front pads are not expensive.
Check the front brake discs for wear. Discs should be good for at least 20,000 miles, possibly two to three times that figure depending on how much use the brakes have had. A set of replacement disks, including pads, will probably cost around £200.
ENGINE : There is not a vulnerable cam belt, instead the roadster has a timing chain. This chain can sometimes rattle a little, again it’s more of a characteristic than a problem.
The usual rules apply for checking the oil. Check the dip-stick, look at the colour and texture of the oil. Also check the inside of the oil filler cap is clean, you do NOT want to see a grey sweaty sludge, this would indicate head-gasket problems.
Note: Roadsters do not have a sump plug, the oil is sucked out by via the dip stick entrance, dealerships have a pump for that purpose. Some people do their own oil changes, but it is not easy. There are those that have replaced the sump with one that has a drain plug (a third party modification).
It is also interesting to note that the last five digits of the chassis number is the build number. There were exactly 43000 roadsters made, numbered sequentially as they came off the production line from 00001 to 43091 - erm...I know the maths does not add up, I guess they skipped a few numbers.
HANDBRAKE : Check the hand brake works, when the car is turned off in the “Neutral” position it is all that holds the car. Roadsters can engage reverse before switching the ignition off, this locks the wheels, it is the equivalent of putting an automatic into “Park”.
REMAPS : It is not uncommon for any of the models to have been remapped. This involves replacing the software that controls the engine management with new software to perform differently, some giving more acceleration, some more torque at various speeds. Remaps would officially invalidate a warranty, however Smart dealers often do not detect it. You need to make your own mind up about remaps, but just because the car has a remap it doesn’t necessarily mean it has been driven hard, as someone pointed out, just because you have the extra power does not mean to say you will use it every second of every journey, just as you would not floor a car every journey.
STEERING : It should feel tight and accurate, no play. Roadsters drive like they are on rails, the car will go exactly where you put it. Make sure there is no clunking when moving from lock to lock. It seems like the most unlikely car to need it, but most roadsters have power steering, this does cut out at higher speeds, not that you can notice. A few owners have reported needing a new steering rack.
HEADLIGHTS : Check all lights are working. Some bulbs can be a job to replace. Headlamp units are not overly expensive, allow about £50 to replace a cracked light (if you do it yourself). Xenon light bulbs fitted into standard units are not legal. Xenon lights, however, if fitted as a factory option are legal and will have headlight washers fitted. A factory fitted Xenon unit is expensive, roughly £500 per unit. Finales and Brabus Xclusive models will not have factory fitted Xenon units, because the plastics were too shiny then lights caused too much dazzle, so it was not an option on cars with colour matching front panels.
FRONT LIGHTS : Check that the 2 lower grill lights function correctly, they match each other (there were 4 different types) and make sure the glass isn't broken as the units are expensive to buy and awkward to fit.
REAR LIGHTS : Check all the rear lights work as the Roadster can suffer from water corrosion in the wiring loom to the rear lights.
Also pay attention to the lenses, check to see if any water is trapped inside. A small hole drilled into the lens will sort it out.
INTERIOR : Check the panel lights up evenly, it uses surface mounted LEDs and they are hard to replace! Seats generally tend to stay in good order, just check for accidental tears or burns from cigarettes. I always look at the ashtray and lighter, I like to see these unused.
These pictures show a 2005 Brabus Xclusive with a broken pipe after just 12,000 miles. That same car is just about to go in for it’s FOURTH set of pipes! Look for cracks, not just breaks. Although be warned, they can be so fine you will not see them!
Air conditioning then, although nice when working, can be a very costly repair. Look at between £600 and £1000 depending on the dealers labour, they have to lower the engine, fit the new pipes, check the system for leaks, re-gas, test, etc. Don’t expect the pipes to last on a repaired system though!
You might want to put air conditioning low of your shopping list! Open the roof instead!
If a key is not working you will need to get the cars SAM unit reprogrammed by SMART to recognise it. Keys should be rotated frequently to ensure both are kept in sync and working. Reprogramming a key might be expensive, the price seems to vary from one Smart dealer to the next, so check first. To buy a second key and get it programmed could cost between £100 and £160 pounds!
Ideally you want to run a hose pipe to simulate rain fall over the roof for a few minutes. Leaks tend to come where the roof bars meet the door glass, particularly front and rear, by the gutters. Bad seals will be apparent immediately as you see quite a stream of water run down the inside of the glass. A tiny drip after a few minutes is acceptable in my opinion, a stream is not. Dealers will adjust the window and door position, and possibly fit new seals in order to rectify this. You can make the adjustments yourself providing your happy taking doors to bits, there are some guides available on the internet to help you do it yourself.
Boot seals have been known to leak too, so check for water stains on the carpets in the boot too. And remember, everywhere might be dry now, but it could have been dried out for the sale! Don't believe a dealer that says they washed the carpets, carpets tend to vacuum clean or brush up, if they're that bad to need washing it must say something about the way the car was kept!
The most serious of leaks comes from the front bulk head where the tridion meets. You should take out the inner boot lining and have a look at the seals there. You may see additional sealant added by the dealers as either a fix or a preventive. Front end leaks can be serious, water can get into the electrical control box and cause corrosion, the electrics then go haywire, flashing lights, wipers that will not turn off, etc. A replacement control box will cost a lot, around £500 for a “SAM” (fuse box) including fitting and coding.
Check for droplets of water in the rear center brake light, it is easily fixed but shouldn't be like that.
ALLOY WHEELS :
You should really check the wheels are not buckled or have any flat spots. To do this, jack the car up and spin the wheel, looking from both the outside and the inside should reveal if there are any distortions. Brabus wheels seem to buckle very easily. Check it! Brabus wheels are over £350 each. You may not feel a buckled wheel while driving it.
SOFT-TOP ROOF : Where a soft-top is fitted (which is most cars), make sure it moves back and forwards smoothly without jerking. It is not uncommon for the fabric to fold itself incorrectly on the way down, this is easily rectified. The roof should be quite black, a faded roof probably has not been looked after well. Smart, and other companies, sell treatments to clean and seal the roof, these should have been applied regularly. Water should sit on a well treated roof in beads.
The side roof bars clip under the front boot space, there should be an end piece to slide on each roof bar to allow it to clip in place under the front, make sure both of those are present.
The roofs do have a tendency to creak, it’s part of the character! It is not economically viable to fit an electric roof to a roadster supplied only with a hard top. Although a hard top can be fitted with a few modifications to the edges, however it may cost around £600 to £800, they come up for sale second hand from time to time.
Ask the seller what they have treated the roof with, if it has been well cared for they would have used some kind of water repellant on it specifically for “rag tops”!
ELECTRICS : Refer to “ Leaks ”. Ensure everything works!
Budget around £100 per tyre. Bridgestone tyres and Continentals are the brands Smart fitted.
Both Bridgestone and Continental are recommending a maximum life of 10 years for their tyres, you’ll find more information about this on their web sites. Check the state of the tyre side wall and tread depth as low mileage cars could still be running original tyres nearing 10 years old. You can get perishing of the sidewall and edge which can weaken the tyre.
The chronological age of any tyre can be found on the tyre sidewall by examining the characters following the symbol "DOT".
For tyres manufactured after the year 1999, the last four numbers identify the date of manufacture of the tyre to the nearest week. The first two of these four numbers identify the week of manufacture (which range from "01" to "52"). The last two numbers identify the year of manufacture (e.g., a tyre with the information "DOT XXXXXX2703” was manufactured in the 27th week of 2003).
For tyres manufactured prior to the year 2000, three numbers instead of four indicate the date of manufacture.
EXTRAS : You might as well try and get as many optional extras as possible, see the model guide on this site to see what should be on your car.
*Front Fog Lights * Electric mirrors * Center Arm Rest * iPod Holder and Interface to Radio * Bluetooth Phone Kit * Heated seats * Leather seats and trim * Hard top in addition to a soft top (and vice versa) * Automatic wipers * Automatic headlights (come on when dark) * Alloy Wheel upgrades * Smart luggage set (custom made luggage) * Cup holder insert in CD tray * Floor mats (I put rubber ones over my Brabus ones to protect them further!) * Twin center exit exhaust (a Brabus part) * Sound package (uprated speakers + tweeters) * Gear change paddles on the steering are very desirable * Center pods showing boost pressure and engine temperature * Air Conditioning * Satellite Navigation (rarely found, an expensive Smart optional extra!) Cruise Control featuring Speed Limiter Parking Sensors (optional - two rear sensors with audio beep alerts) Trip Computer
There are lots of other third party extras for the roadster too.
DRIVING : If you have never driven a roadster before then be prepared to really learn the gearbox! It takes quite a bit to get used to and performs at it’s best in manual gear change mode. If you want a true automatic then I would suggest the roadster is probably not the car for you.
Check the clutch doesn't clunk on pulling away. You can (at the risk of scaring the owner) try a sports start, foot to the floor from stand still and it'll rev to 3000 (I think) and then let the clutch up. Try and make sure there is no clutch slipping in any gear! Maybe a steep hill will help!
It’s normal to hear a “chirrup” sound from the engine as the gears change, this is the turbo charger releasing the unused compressed air, it’s the sound of the waste gate opening, the air is pumped out back the way it came in, there is no dump valve. Some cars have had a third party dump valve fitted, this is an area of much debate as to wether it makes any difference or not.
Roadsters hold the road brilliantly. If you test drive one that seems to stray from the line your putting it on, then the tyres, tracking, suspension, or something else is not right! If in doubt, test drive another and compare.
SERVICE HISTORY : No service history? No sale. Make sure the car has been regularly serviced, at least once a year or every 10,000 miles maximum. Really the roadster will last better going 6,000 to 8,000 miles between services. The service book should be stamped up.
When you are in the car, press the button on top of the speedometer twice with the ignition on, it will tell you how many miles are left until the next service. An “a service” is cheaper, a “b service” more expensive, they are represented on the display by one or two spanner icons respectively.
“a” and “b” services alternate. On early cars there was also a “c” service too. Smart revised the system making just an “a” and “b”. A really well loved car would have gone “b” service through-out, it seems most remapped owners always do the “b service”.
MANUALS : There should be an owners manual. Also they may be a Smart dealer location booklet, although it will be out-of-date anyway! Don’t forget the radio security code card too!
Some owners have treated their tyres with a special liquid that will automatically repair any puncture. Here is one such treatment: Ultraseal ; carrying a compressor and pump is no longer necessary. Be warned, such sealants make it impossible to balance your wheels!
MILEAGE : There are a lot of dealers who say the cars are not good for many miles, this is nonsense. Ignore them. Providing the car is regularly serviced, there is no reason why it should not go on and on. Several owners have reported their roadsters turning 100,000 miles.
A lot of second hand roadsters will have fairly low mileage, often the roadster is purchased as a second car. A lot of us on the forums use ours every day as our only car, they can handle the mileage if looked after.
NUMBER OF OWNERS : One owner with higher mileage or several owners with low mileage? Which is better? You could argue that a high mileage car with one owner has not had any problems, hence the owner kept it for a long time. You could argue that a low mileage car with many owners was problematic and passed from person to person. But, there is nothing to say that either is true or false. You have to make your own mind up. A well serviced car is key no matter what.
DO YOU FIT ? This frequently comes up, usually tall people ask. I’m not so tall so I have no problem. Smart’s office answer on this question:
The interior of the car has been optimised in terms of ergonomic and visibility for occupants up to 1.90 metres tall and weighing 95 kilogrammes and a petite 57 kilogrammes and 1.51 metres.
V5C : The roadster you look at could show the colour on the V5C registration document as being either black or silver, it relates to the colour of the tridion, not the main colour of the car! So a red roadster with black tridion may well be listed as a black car! In 2007 the DVLA finally changed the rule that the colour of a car is not based on it’s chassis colour but more sensibly the most dominant colour will be listed.
NOTES : The roadster has no steering lock. Parking in reverse will stop the vehicle being towed easily.
FINAL TIPS : There are sites on the internet that will give you tips about your behaviour when looking at a car, and how to negotiate a good deal. You should NOT appear over enthusiastic, at the end of it all, the seller is after as much as they can get, and you should be after paying as little as possible! Good luck!
Before you do any deal get the car checked by a reputable motoring organisation such as the AA, a mechanic, or a garage.
You can also do an online check on any vehicle, for a charge: http://www.vehiclecheck.co.uk /
- 0121 247 0619
- [email protected]
- Mon - Fri: 9:00 - 16:30
Smart Roadster 2003-2006 Aftermarket Cruise Control Kit
Vehicle Specific Cruise Control for Smart Roadster 2003-2006
Cruise Control: Elevate your driving experience with our advanced cruise control system.
• Maintain a steady speed effortlessly • Set custom speed limits for safety • Prevent exceeding preset speed limits • Vehicle Specific for Easy Installation • Pre-programmed for compatibility • Upgrade to CM5 command modules • No impact on vehicle warranties
Contact us today for a safer and more comfortable ride!
Installation – what to expect:
- Average installation time – 3+ hours
£ 467.00 Original price was: £467.00. £ 398.73 Current price is: £398.73.
Description
Additional information.
Cruise control is a versatile product that offers comfort and safety to both drivers and passengers. It not only allows the driver to maintain a constant speed at the touch of a button, but also provides a driver-set speed limiter that can be adjusted according to road conditions. Moreover, it comes with a top-end speed limiter that prevents the vehicle from being driven above a certain speed limit, which is set during installation. We believe that everyone can benefit from having a cruise control installed in their vehicle.
If you are interested in purchasing and installing a cruise control, Conrad Anderson provides installation services through our approved 3rd party installers. The installation process typically takes around 2-3 hours, although some vehicles may require more time depending on their make, model, and year, as well as their physical and electronic accessibility.
With a cruise control installed in your vehicle, you can enjoy a more comfortable and safe driving experience. Contact us today to learn more about our cruise control products and installation services.
What’s included in the box:
- Cruise control computer: preprogrammed for your vehicle
- Computer wiring loom: for power and vehicle speed pulse, brake switch, clutch switch or CANBUS connection.
- T-Harness: plug-in connection to the throttle pedal
- Command module: GC3 standard stalk, with the option at purchase to have GC4 or GC5
Cruise control is a useful feature that enhances driver comfort and safety, but it also comes with certain safety features to ensure that it operates safely and reliably. Here are some of the safety features that are commonly found in cruise control systems:
- Brake circuit detection: Before cruise control can engage, it must detect resistance across the brake circuit to ensure that the brakes are functioning properly. If there is a fault in the brake lights or brake switch, the cruise control will not work.
- Speed deviation limit: If the vehicle’s speed increases or decreases by more than 15% of the set speed during cruise control operation, the system will automatically deactivate. For example, if the vehicle is driving up a steep hill and cannot maintain the set speed in the current gear, the cruise control will deactivate.
- Throttle pedal connection: The connection between the throttle pedal and the cruise control only affects the vehicle’s operation when the cruise control is turned on. When the cruise control is turned off, the pedal signals are unchanged, allowing the throttle pedal to operate normally.
- Brake and clutch deactivation: The cruise control will automatically deactivate if the driver applies the brake or clutch pedal, ensuring that the driver retains full control over the vehicle.
These safety features help to ensure that cruise control operates reliably and safely, providing drivers with a more comfortable and stress-free driving experience.
General installation process – for Smart Roadster 2003-2006
Installing a cruise control system typically requires accessing the area under the dashboard and steering column. Here are the general steps involved in the installation process:
- Remove the knee-trim and steering column cowling to access the area where the cruise control components will be installed.
- Use soldered joints for the +ve and CANBUS connections, which can be found in the OBD or Data link connector.
- Unplug the throttle pedal connector and place the T-harness inline. Connect the other end of the harness to the cruise computer.
- Install the command module to the steering column cowling, ensuring that you mark the best position before removing the trim. Run the cabling and connect it into the main computer loom.
- Once the components are installed, perform a simple setup procedure that typically takes 10-20 minutes. This procedure does not require any extra equipment, and the necessary information to communicate with the vehicle is pre-installed by Conrad Anderson.
- Take the vehicle on a short drive and test the cruise control to ensure that it is working correctly. Some modified body or high payload vehicles may require some adjustment to make sure the speed is kept constant and the acceleration rate is suitable.
By following these steps, you can have a cruise control system installed in your vehicle, enhancing your driving experience with increased comfort and safety.
Command module functions
The GC3 is the basic stalk that is included in the cruise control product price. It provides all the basic functions required for cruise control operation, including setting the current speed, increasing or decreasing the speed, coasting to deactivate the cruise (which can also be done by applying the brake or clutch pedal), and resuming the cruise at the previous speed.
Alternatively, there are other command modules available that include the same basic functions as the GC3 but with additional preset speed memory buttons. These buttons allow you to save specific speeds and quickly recall them later, without having to manually adjust the cruise control every time you want to travel at a different speed.
For example, the GC4 command module includes two preset memory buttons, while the GC5 has three preset memory buttons in a new design. These preset speeds can be changed at any time, but they are non-volatile, meaning they will remain set even after the ignition is turned off.
By providing these additional preset speed memory buttons, the GC4 and GC5 command modules make it easier to use cruise control, allowing you to quickly adjust your speed to match different road conditions or driving situations.
When installing the command module for the cruise control, the stalk command modules are bolted to the steering column cowling. The wiring for the command module runs through the centre of the hollow mounting bolt and connects to the main computer wiring loom. The wires are supplied non-terminated, which means that they need to be run through the drilled cowling before being connected to the pre-pinned cables.
During installation, it’s important to take care to mount the module in a location that provides enough space behind the cowling for the securing nut and flanged washer. The final position of the stalk is adjustable using the integral ball joint, so it can be adjusted to the optimal position for the driver’s comfort and convenience.
Overall, the installation process for the command module requires careful attention to detail and precision, but it is relatively straightforward for an experienced installer. Once the module is installed and connected to the main computer wiring loom, it can be calibrated and tested to ensure that it is working correctly and providing the desired functionality for the driver.
Troubleshooting:
If the cruise control does not activate, there are several steps that can be taken to diagnose and troubleshoot the issue. The first step is to check the power supply and main fuse for the command module. If the module indicator light does not change from green to red, it may be

Product Enquiry
Welcome to the new Conrad Anderson Website! Dismiss
- 01483 578748
- [email protected]
- Unit 10, Foundation Units, Westfield Road, Slyfield, Guildford

History of the smart roadster – part 3
The Smart Roadster’s TRIDION safety cell is available in black, or in silver for an extra charge. The body panels are available in the colours jack black, shine yellow and spice red. The colours champagne remix, star blue and glance grey are available for an extra charge. The interior of the Smart Roadster is available in the colours scribble black or scribble red, or in black leather for an extra charge.
The Smart Roadster is available with a soft top or alternatively with a hardtop with a matt surface at no extra charge.
The Smart Roadster’s standard equipment also includes SOFTOUCH automatic transmission, sports seats, leather steering wheel and leather gear knob and a flexible service interval display which calculates and displays the change intervals depending on the oil used.
The sports package option offers customers a three-spoke leather sports steering wheel with rocker switch steering wheel gearshift and 205/45 R 16 Spikeline light-alloy rims. The safety package consists of fog lamps, electrically adjustable and heated door mirrors and side airbags for an extra charge.
A comfort package available as an option consists of cruise control, electric power steering and a trip computer. Useful information can be called up on its LCD display, for example a fuel gauge indicating the remaining level of fuel in 0.5 litre steps and the distance that the car can travel with the remaining amount of fuel. Times traveled and intermediate times can also be recorded, saved and correlated with the sections driven. The trip computer also has an electric logbook.
It visualises a number of warnings: it gives a signal when the doors are not closed properly or when the soft top is open. It also informs the driver if the engine temperature is too high, the oil pressure too low and about the brake fluid level. Moreover, it warns the driver when there is a danger of icy roads (from +3 degrees centigrade). The driver can also call up the distance or the time until the next service interval.

When the soft top is fully open these bars can be removed and stowed in the front luggage compartment. For safe, scratch-proof and space-saving stowage, the bars fit into a system consisting of moulded parts and recesses in the plastic lining of the luggage compartment. When the roof bars are stowed here the front luggage compartment offers a capacity of 59 litres. Otherwise it is easy to stow a standard size crate of water or beer here. The roof variants
Electric folding soft top as an alternative to the hardtop
With a roof system consisting of a soft top and a hardtop which can be used together or alternatively, the Smart Roadster and Smart Roadster Coupés offer their owners maximum open-air driving pleasure. As well as a two-piece, removable plastic hardtop that can be transported in the rear luggage compartment, an electrically operated folding soft top is available as an option for both the Smart Roadster and the Smart Roadster Coupés.
The Smart Roadster comes with the soft top as standard. However the customer may also choose a hardtop with a matt surface as a basic appointment at no extra charge. This is also available as an accessory. The Smart Roadster Coupés roll off the production line with a high-gloss hardtop. Here, the soft top is available as an option. With a system weight of just 14 kilogram’s the folding soft top also makes an important contribution to the overall low weight of the cars.
The hardtop is divided lengthways in the middle. It covers an area 750 millimetres long and 1000 millimetres wide. The roof segments can be removed with a few deft movements, packed into special moulded plastic parts and stowed in the rear luggage compartment. The components weigh a total of just ten kilogram’s and are made of fibreglass-reinforced polyurethane foam.
The soft top can be opened to any desired position with a rocker switch on the centre console, even whilst driving, and closed again by pressing the button. It only takes approximately ten seconds to fully open the soft top which slides back under the roll bar to the luggage compartment. When the soft top is down the driver retains full vision through the rear window.
To reliably rule out operating errors and thus damage to the roof system and cargo there is a folding, spring-loaded strip on the rear luggage compartment floor. When the soft top is open, its vertical position prevents the cargo from touching the soft top. The Smart Roadster Coupés then have a luggage compartment capacity of 104 litres. When the luggage compartment is fully loaded the strip is folded down horizontally by the luggage on it. In this case the luggage compartment has a volume of 189 litres and the folding top cannot be opened.
Read more about Roadster specification next month.
Follow us on Social
Get in touch.
- 07738 247233
- www.smartcarspecialist.com
Come and see us
Smart Car Specialist Unit 10 Foundation Units Westfield Road Slyfield Guildford Surrey GU1 1SF

- Part numbers
- Help Tickets
- Forgot Password?
Modification and Maintenance for your smart
Latest in Roadster
- Engine earth lug weakness
- Inner CV boot replacement
- Changing the combination filter
- Boot lock replacement
- Headlight conversion
- Get in touch!
Installing cruise control
- " onclick="window.open(this.href,'win2','status=no,toolbar=no,scrollbars=yes,titlebar=no,menubar=no,resizable=yes,width=640,height=480,directories=no,location=no'); return false;" rel="nofollow"> Print
To add to your driving comfort, why not install cruise control? Now that average speed cameras are becoming ever more common, cruise control may be more a necessity than a luxury. This addition will require a TAN from your local smart dealer. The exact price of the TAN varies but expect to pay around £100. You only need the following part in this mod:
- Cruise control and wiper stalk (SQ0012540V004C96A0)
Physically, all you need to do is replace the existing wiper stalk with the cruise control one.
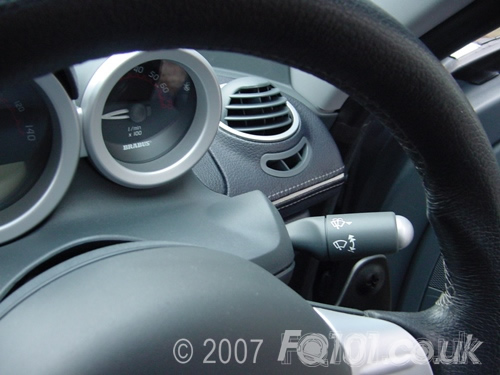
You will also need the following tools:
- Torx Bit T10
Start off by slackening the 4x TX10 screws under the steering wheel that secure the dash.
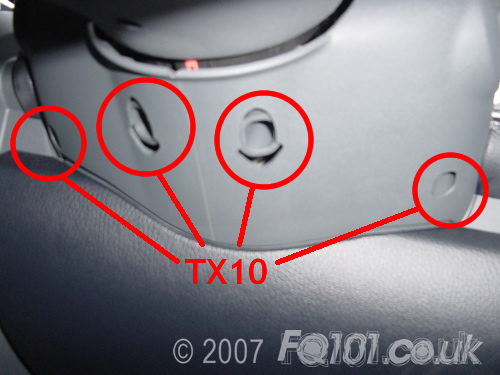
The top and bottom section of the dash will pull apart. You may need to apply a bit of force as the front section is secured with a clip shown in the picture below. As the dash comes apart, the insert that sits around the back of the speedo and rev dials will ping out. Move this out of the way.
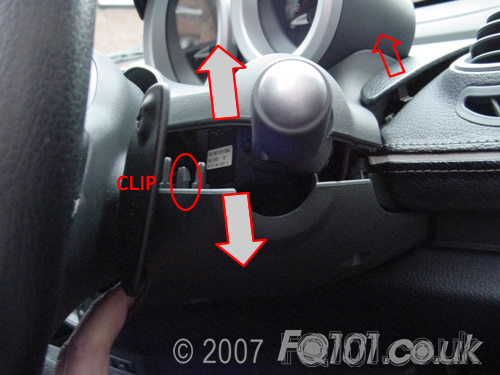
Move the speedo back out of the way. You can disconnect it if it makes it any easier to work.
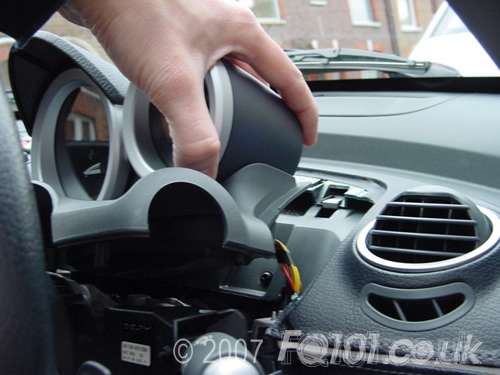
To remove the wiper stalk from the car, push the retaining clip in - you will hear it click. Pull the stalk upwards until it is free. You may need to gently persuade it with a screwdriver.
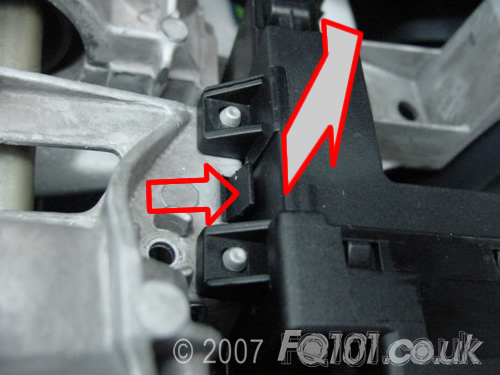
Remove the wiring by squeezing the lever on the side and pulling.
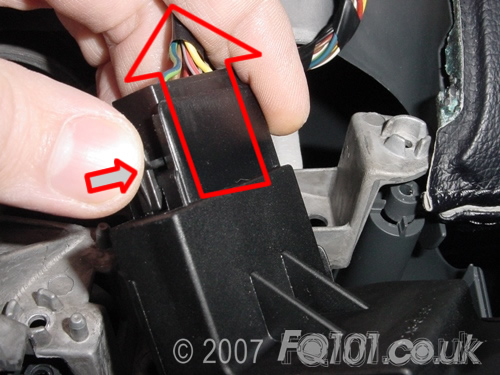
Now that the old wiper stalk is free, offer up the cruise control stalk. Reconnect the wiper wiring.
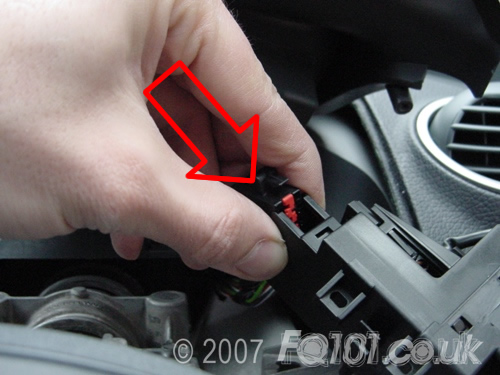
You will notice a small connector that is taped to the wiring. Undo this and straighten out the wires.
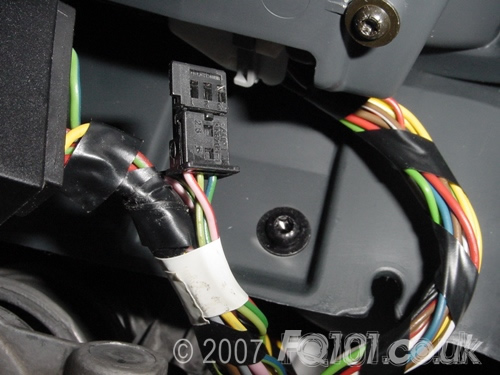
Plug this connector into the small socket on the cruise control stick.
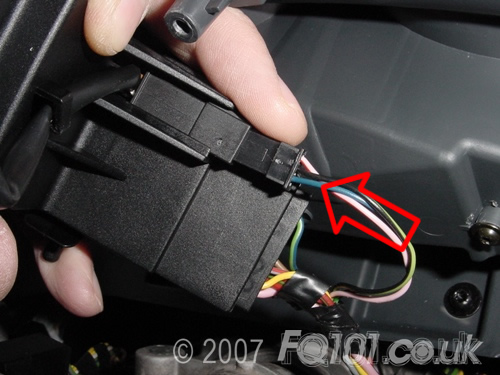
Push the cruise control stalk back into place.
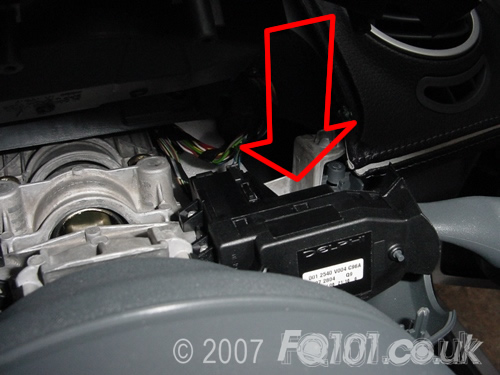
Clip the two sections of the dash back together before securing in place with the Torx screws.
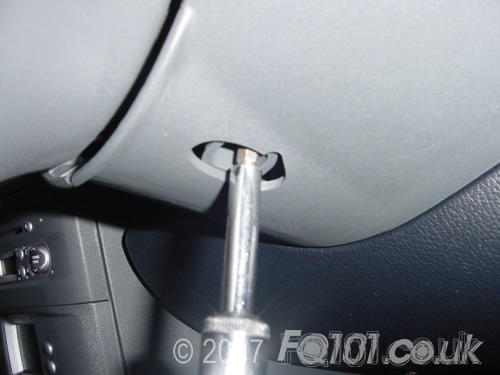
Push the frame back into place around the speedo.
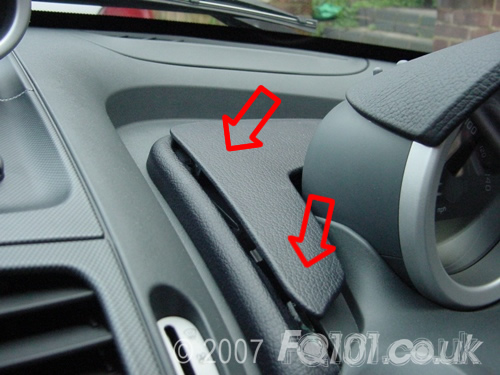
For the finishing touch, you need to remove the end cap from the old wiper stalk. I recommend using a blade to prise it off as a screwdriver will chew up the edges.
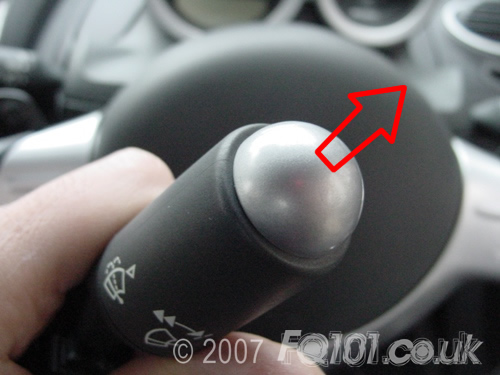
Once removed, simply clip onto the end of the cruise control stalk to complete the installation. The wipers will work but flicking the cruise control function will do nothing until you get a TAN from smart.
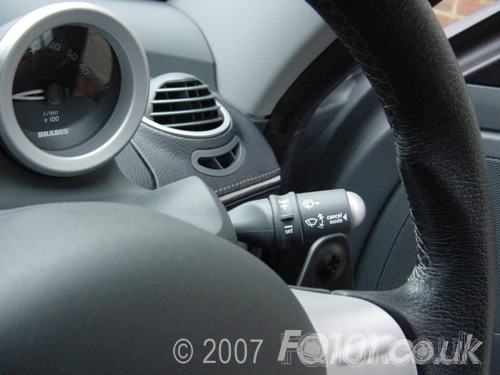
Search Roadster:
Search for guides and limit results to just this section. You can also narrow results by filtering sub categories.

- Meet the team
- Privacy Statement
© 2006 - 2024 www.fq101.co.uk
- Join Evilution

Latest Normal Mods
450 Steering Tie Rod
Roadster High Level Brake Light
Hashtag Key Excessive Battery Use
453 Rear Wheel Bearing Change
Roadster AC Condenser Removal
Latest Premium Mods
453 Windscreen Washer Pump
453 Front Wheel Bearing Change
453 Speedo Shows -:– For Time
Roadster Brake Booster Removal
Roadster Coolant Radiator Removal
Latest Updated Mods
Subscriber Perks
453 Fuses (Petrol)
Grundig Sound Upgrade
451 Paddle Wheel To 450/Roadster
Highest Rated Mods
Oil Coolers
453 Oil Change
Grundig Stereo Difference
450 Side Window Removal
Vehicle Identification Number VIN
Most Viewed Mods
451 Heater Fan Removal
What Smart Do I Own
450 – Reset The Service Indicator
3 Lines On The Speedo
Common Questions
Extraius Socius

Cruise Control – 450
Mod description, mod details.

Fitting The Cruise Control Stalk
Firstly you need to get a cruise control stalk from smart. Fortwo Cabrio & Roadster stalk number 001 2540 V004 C96A 00 Fortwo Coupe stalk number 001 2539 V004 C96A 00 (thanks J500ANT).
Please be aware, this is only for the 700cc fortwo fortwo and Roadster.
Remove the 4 Torx10 screws from under the speedo pod.
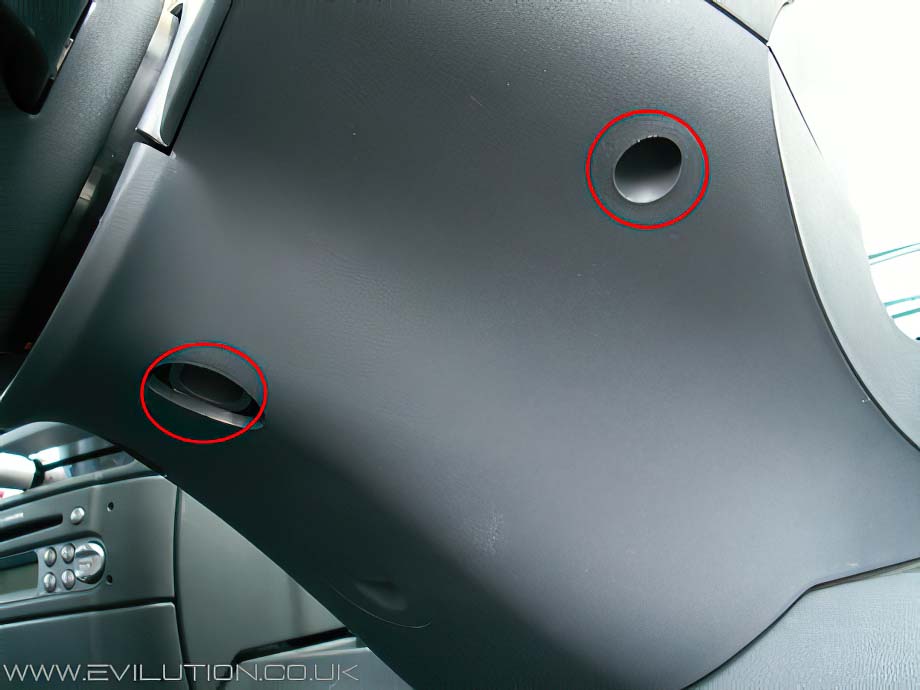
Get your fingers in the front lip and lift the speedo up to remove, tuck it out of the way.
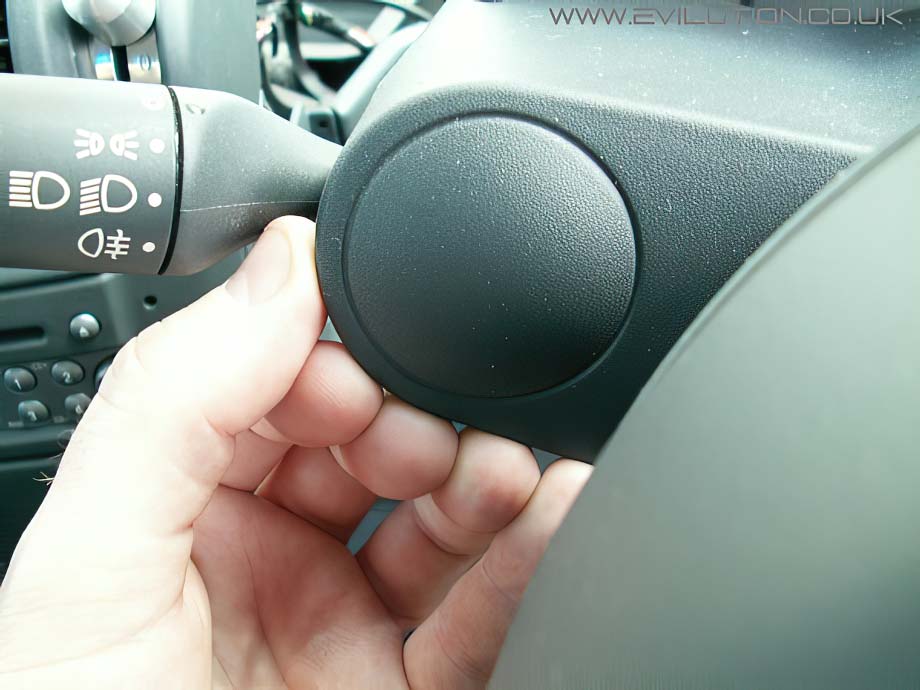
This is what you will find.
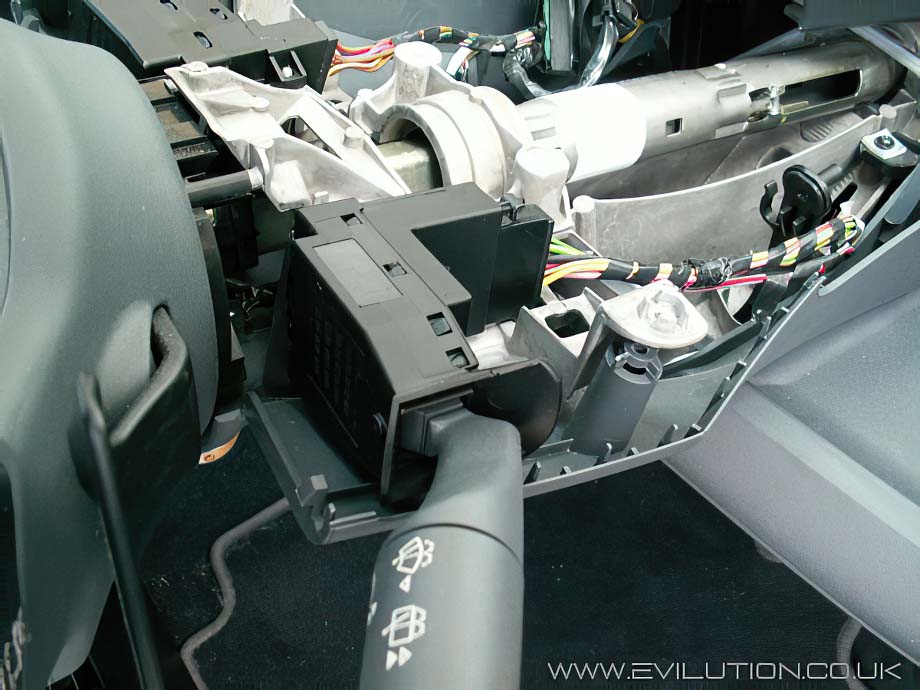
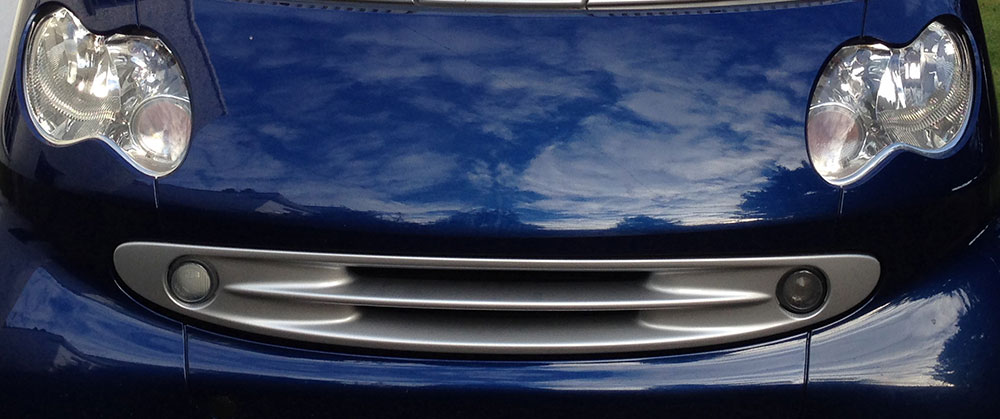
- Cabrio Roof Repair
- Sam Unit Repairs
- Replacement Keys
- Smart Car Diagnostics
- Engine Refurbishing
- Cruise Control
- Paddle Shifts
- OM Sound Pack
- Daytime Running Lights
- Passenger Airbag Switch
- Heated Seats
- Aftermarket Sump
- Customer Reviews
- ForTwo (450)
- Roadster (452)
- ForFour (454)

01242 37 47 27
Smart Addiction

- Clutch Adjustment
- Airbag Reseting
- Smart Car Keys / Coding
- Tan Code Activations
- Cabrio Roof Repairs
- Roadster Instrument Clusters
- 451 TCU (GEARBOX) UPDATE
- 451 TCU (GEARBOX ECU) REPLACEMENT
- Roadster Folding Top
Cruise Control - Smart Car Mods & Retrofits

To add cruise control to you smart is a relativity inexpensive upgrade for some smart cars
700cc fortwo 2003-2007 and roadster models
1000cc fortwo 2011-2014 (451).
NEWS.... We have just finished prepairing our Smart Roadsters for sale. More...

No products
- Brabus ForTwo 450
- External ForTwo 450
- Internal ForTwo 450
- BodyWork Parts Smart ForTwo 450
- Mechanical spare parts Smart ForTwo 450
- Electronics spare parts Smart ForTwo 450
- SmartKits ForTwo 450
- Tuning-Racing ForTwo 450
- Brabus ForTwo 451
- External ForTwo 451
- Internal ForTwo 451
- BodyWork Parts Smart ForTwo 451
- Mechanical spare parts Smart ForTwo 451
- Elettrica Smart ForTwo 451
- SmartKits ForTwo 451
- Tuning-Racing ForTwo 451
- Brabus ForTwo 453
- External ForTwo 453
- Internal ForTwo 453
- BodyWork Parts Smart ForTwo 453
- Mechanical spare parts Smart ForTwo 453
- Electronics spare parts Smart ForTwo 453
- SmartKits ForTwo 453
- Tuning-Racing ForTwo 453
- Brabus Roadster 452
- External Roadster 452
- Internal Roadster 452
- BodyWork Parts Smart Roadster 452
- Mechanical spare parts Smart Roadster 452
- Electronics spare parts Smart Roadster 452
- SmartKits Roadster 452
- Tuning-Racing Roadster 452
- Wheels Smart Roadster 452
- Brabus ForFour 454
- External ForFuor 454
- Internal ForFour 454
- Body Pannel Smart ForFour 454
- Mechanical spare parts Smart ForFour 454
- Electronics spare parts Smart ForFour 454
- SmartKits ForFour 454
- Tuning-Racing ForFour 454
- Brabus (453L)
- Esterno (453L)
- Esterno (454L)
- BodyWork Parts Smart ForFour 453
- Mechanical spare parts Smart ForFour 453
- SmartKits SKs (453L)
- Tuning - Racing (453L)
- Smartkits collections
- The Cars of Our Customers

Display all pictures
Kit Cruise Control Smart ForTwo 450 Roadster 452
Reference:: SKs-450-Int-0174
Condition: New product
Kit Cruise Control Smart ForTwo 450 Roadster 452 to drive with more comfort.
More details
Warning: Last items in stock!
Availability date:
- Ask a question for this product
The minimum purchase order quantity for the product is 1
Add to cart Order by Phone Order by Phone +39 392 43 86 709
Add to wishlist
Istruzioni Kit Cruise Control
Pack content
No customer reviews for the moment.
Write a review

* Required fields
Submit or Cancel
© 2016 SmartKits SKs - P.I. 04466840875 - Credits
- Body Controls
- Climate Controls
- Information Displays
- Instrument Clusters
- Power Locks/Kits
- Power Roofs
- Power Seats
- Power Steering
- ABS Modules
- ABS Module Bolt Kit
- Engine Control (ECU/ECM)
- Throttle Bodies / Kits
- Transmission Control (TCM)
- ALL PRODUCTS
- Testimonials & Reviews
- Top 5 Reasons to choose us
- How This Works
- Auto Shop Discounts
FIND YOUR MODULE

- Type Select Type ATV/UTV Car/Truck Motorcycle RV
- Year Select Year
- Make Select Make
- Model Select Model

WE REBUILD AUTO ELECTRONICS.
ABS Control Module Rebuilds

Instrument Cluster Rebuilds

Climate Control Module Rebuilds

Power Accessory Module Rebuilds

Powertrain Module Rebuilds

All Products

Popular Rebuilds

We are a team of electrical engineers and technicians who remanufacture automotive electronics. When your ABS light comes on, or your temperature controls stop working we can help. If the mechanic quotes you a high replacement cost, or you just can't find the part anymore check out our website for a low cost, sustainable alternative. You can remove the part and ship it to us yourself or ask your mechanic to do it for you. Still have questions? Give us a call, we're happy to help!

Seriously into modules since 2004
From its humble beginnings in 2004 operating out of his parent’s tiny pump house, Gavin Curtis grew ModuleMaster into a leading-edge technology company specializing in the repair of automotive electronics. Today, ModuleMaster operates out of two state-of-the-art facilities in Moscow, Idaho, home of the University of Idaho.
ModuleMaster receives over 1,000 modules a month including ABS controllers, instrument clusters, climate control modules, trip computers, and the list keeps growing.
Customer Testimonials
I have used module master on 2 occasions for my 2004 Chevy Suburban. The first time for the ABS module and the second time for the instrument cluster. In both cases both were repaired and returned quickly, both worked perfectly. I recommend module master without any reservations! Mike D. / Long Beach, CA
I sent Module Masters an instrument cluster to get repaired that had an ignition off draw which was not the normal gauge problems that GM clusters have. They fixed it and rebuilt it and it is working great now. I couldn’t be happier!! They have great communication and very knowledgeable. THANKS!! Jesse K. / K-Tech Automotive
You folks have found the right blend of customer service and quality workmanship at a reasonable price. American trained craftsmen are the only way to go for us in this segment of the auto parts repair industry. ABS Automotive | San Mateo, CA
My motorcycle ABS unit quit. Bought a used one off the web, sent to Module Master, they sent it back with the note that it was in perfect working order with NO Charge. I installed it and it works! How wonderful to experience old school customer service, honesty, and integrity. I am sending the faulty one for repair today! Awesome! Wonderful! Stuart D. | Atlanta, GA
Just a short note to thank Gavin and his team at Module Masters. Just received my second front seat ECU module for my Bentley, fully restored to original operating condition. Incredibly fast service and a massive saving over new factory parts, I literally saved hundreds of dollars!! I highly recommend Module Master and will certainly use their services again for future projects. Ken W.
Get in touch with us
2006 S Main St
Moscow, Idaho 83843
Mon - Thurs, 8am - 4pm PST
(208) 892-0764
Organizations & Accreditations
Moscow, Startovaya St.,18, bld. 7
Online sale 24\7
- Privacy Policy
- Partnership
Search form
Smart Roadster

Buy high quality lift kits & autobuffers for Smart Roadster 20-40mm at the best price with free worldwide shipping. High quality lift kits ( leveling kits ) & autobuffers ( coil spring spacer ) from the manufacturer for most car models in stock. Please select your car generation.
Smart Roadster ( 2002 to 2006 )

Using SMART Transit
Whether you’re a full-time Moscow resident, a college student, or a visitor, you can ride SMART Transit free to destinations citywide. All buses are ADA wheelchair accessible.
Buses stop at the places people visit most often:
- medical facilities
- grocery stores
- recreational facilities
- downtown shops, restaurants, and events
- residential areas
When you ride SMART Transit, you don’t need to worry about parking or navigating roads in wintry weather. Plus, you help the environment by using less fossil fuel.
Rules of the Road
Observe these rules to help everyone enjoy a safe and comfortable ride.
• No smoking or vaping
• Beverages must be in spill-proof containers
• No disruptive behavior
• No weapons or hazardous materials
• No pets (service animals welcome)
• Shirt and shoes required
Please be courteous:
• Respect other passengers
• Keep conversations quiet
• No rude or profane language
• Use headphones
Waiting for the bus after dark?
Wave an illuminated cell phone or flashlight toward the bus as it approaches.
It will alert the driver that you are there and need the bus to stop.
Strollers, bikes, & service animals
SMART Transit welcomes people of all ages and abilities. If you need to bring extra wheels or a service animal with you, please follow the guidelines below.
Children in open strollers are welcome on buses.
Rules for traveling with a stroller
- Keep the aisle clear of strollers. Please be considerate of other passengers.
- Yield the area for mobility devices to seniors and customers with disabilities. They have priority for use of the area. If this area is not in use, open strollers may be parked there to avoid blocking the aisle.
- Fold your stroller to make room for others. During peak hours, you may be required to fold your stroller before you board the bus. Alternatively, you may wait for the next bus.
- Keep your stroller-bound child secure. A child riding the bus in a stroller should be seated and secured. Stroller wheels should be locked.
Fixed route buses are equipped with bike racks. You must load and unload your own bike. Rack space is available on a first-come, first-served basis. Bikes are not allowed inside the bus.
Loading bikes
1. Remove water bottles, pumps, and other loose items before loading. Accessories could fall off while the bus is in motion.
2. Tell the bus driver that you will be loading your bike. Load your bike from the curb or in front of the bus. Do not step into oncoming traffic.
3. Unlatch and pull down the bike rack. Use one hand to squeeze the bike rack handle, release the latch, and fold down the rack. Hold your bike with your other hand. Please don’t lean your bike against the bus.
4. Lift your bike onto the rack. Fit the wheels into the proper wheel slots. The slot for the front wheel is labeled.
5. Raise the support arm over the front tire. The support arm will prevent your bike from swaying back and forth.
6. Board the bus and enjoy the ride! Choose a seat near the front of the bus to keep an eye on your bike.
Unloading bikes
1. Alert the bus driver that you will be unloading your bike. Do so as you approach your stop. Exit the bus through the front door.
2. Unload your bike. Stand in front of the bus or on the curb, not in the street.
Raise the support arm off the tire. Lift your bike out of the rack.
3. Fold up the rack. Do this only if the rack is empty and no one else is waiting to load their bike. The bike rack locks in place.
4. Step away from the bus with your bike.
Off you go!
Instructions adapted from the Sportworks User Manual
Service animals
Service animals are welcome on SMART Transit buses.
Animals must be under the control of the handler at all times, as required by the Americans with Disabilities Act (ADA). At no time can the bus driver assume control of the animal.
Removal of a service animal from the bus
If a service animal is disruptive or poses a threat to the health or safety of others, the driver will ask the handler to remove the animal.
A service animal may be removed from the bus for any of the following behaviors:
- Uncontrolled barking
- Jumping on other people
- Running away from the handler
- Aggressive behavior towards other passengers or service animals
- Obstructing the aisle
The driver may not refuse service to a passenger accompanied by a service animal on the basis of another passengers allergies.
Need extra accommodations?
SMART Transit is an effective, affordable mode of transportation for people with special needs. Passengers with disabilities may request reasonable modification to SMART Transit policies, practices and procedures to ensure accessibility. Contact SMART Transit administrators for assistance. Public information and other documents may be available in an accessible format, or another language, upon request.
SMART Transit also offers a Dial-A-Ride service. This low-cost ride-sharing program picks you up at the curb of your home and takes you to the curb of your destination.
COVID-19 policy
In accordance with City of Moscow guidelines, SMART Transit does not currently require face coverings aboard buses.
- ICE - (In-Car-Entertainment)
- Brabus parts
- Coupe parts
- Electronic parts
- Engine parts
- Exterior parts
- Fixings & Fasteners
- Interior Parts
- Lorinser parts
- Roof systems & parts
- Service parts and tools
- Suspension and Steering
- Wheels + Accessories
- Windscreen Wiper & Systems
- ICE - (In-Car-Entertainment) used
- Brabus parts used
- Brakes used
- Coupe parts used
- Electronic parts and sensors
- Engine parts used
- Exterior parts used
- Fixings & Fasteners used
- Interior Parts used
- Lighting used
- Roof systems & parts used
- Service parts and tools used
- Suspension and Steering used
- Tuning used
- Various used
- Wheels + Accessories used
- Windscreen Wiper & Systems used
- Interior parts
- Windscreen Wipers and Systems
- Bags and suitcases
- Fixing & Fasteners
- Wheels+ + Accessories
- Windscreen Wipers & Systems
- BRABUS PARTS
- EXTERIOR PARTS
- INTERIOR PARTS
- SERVICE PARTS AND TOOLS
- FIXINGS & FASTENERS
- Wheels + accessories
- Accessories
- Car polish and wax
- Clay and clay kits
- Convertible roofs
- Detailers and finishers
- Gift packs and complete kits
- Headlight restorer
- Insects, resin, tar, oxidation
- Metal cleaners
- Plastic Cleaners
- Scratch removers
- Tyre and rim cleaner
- Window cleaner
- Air fresheners
- Car dehumidifier
- Dashboard and plastic trim cleaner
- Seat and Carpet Cleaner
- Windows and glass
- Penetrating oil & lubricants
- Seals, door edges, rubber, vinyl
- Transmission oil
- Português PT
Smart Fortwo 450 Cruise Control stalk will also fit in roadster 452
Smart Fortwo 450 Cruise Control
Requires further programming to activate cruise control (additional cost involved).

You might also like
Smart Roadster Cruise Control stalk also for the fortwo cabrio
Oem cruise control additional wiring, pluggable wireset to retrofit oem cruise control, 16 other products in the same category:, performance car battery cable earth & earthing lead wire engine smart roadster and fortwo, new smart roadster / fortwo seat airbag right side, new smart fortwo 450/451 am/fm antenna, dab antenna converter from dab radio to regular fm antenna, varta blue dynamic accu starter battery 12v 52ah for petrol cars, relais smart 450 siemens v23134-a52-c643, relais smart 450 siemens -a1201-a402 / v23074-- 12v, new smart roadster 452 or fortwo 450 or forfour 454 cigarette lighter, smart fortwo 450 interior light switch, pressure transmitter inlet manifold sensor for smart roadster 452 also for fortwo 450, electric door mirror switch suitable for the 450 fortwo, 452 roadster and 454 forfour, smart roadster 452 / fortwo 450 alternator generator 75 amp, rear boot tail gate actuator solenoid smart fortwo 450, fuse- a relaybox - smart 450 city coupe 0.6 petrol a4505450001, light & indicator stalk switch smart fortwo 450, smart se drive - auto button switch softtouch, customers who bought this product also bought:, chickenhead logo / emblem for bonnet silver, self-adhesive, smart roadster 452 & smart fortwo 450 sump bolts set (14x), new smart roadster 452 fortwo 450 cd multi changer grundig mcd36 mcd6, new smart roadster am/fm antenna, smart wheel arch extensions suitable for fortwo 450, smart se drive - contact spring auto button softtouch, original oem all weather floor mats - smart fortwo 450 lhd, smart roadster towing eye cover grey silver.

Save products on your wishlist to buy them later or share with your friends.
This shop uses cookies and other technologies so that we can improve your experience on our website.By continuing your visit on the website, you consent to the use of cookies. You can find further information in our privacy statement .
IMAGES
VIDEO
COMMENTS
There are 4 holes which have 4 Torx10 screws at the top. Step 2. Remove the 4 Torx 10 screws using a thin T10 screw driver. Step 3. Find the 3 pin plug shown above, if cruise control has never been fitted to your car before it will be taped to the wiper stalk wiring. If you find this plug you can skip to step 11.
PRECISION CRUISE is a retrofit electronic cruise control system that provides all the functionality and convenience of Original Equipment systems, along with many enhanced features. This unit comes pre-programed for your specific vehicle and the full vehicle compatibility list can be found under the compatibility tab above. Luxury and Convenience.
Cruise control* Deactivating the cruise control The cruise control is switched off: when braking. when the esp system is in operation. when the control lever is pressed one time. The driving speed last set with the cruise control is stored. >Note! The speed last memorised is erased when you turn off the engine. Page 137: Speed Limiter
Fitting The Cruise Control Stalk. Firstly you need to get a cruise control stalk from smart. Roadster stalk number 001 2540 V004 C96A 00. Look under the steering wheel cowl, you will see 4 holes. Remove the Torx10 screws. Split the upper and lower cowls and lift the speedo. The surround that sits behind it will pop up. Remove the surround.
* Satellite Navigation (rarely found, an expensive Smart optional extra!) Cruise Control featuring Speed Limiter Parking Sensors (optional - two rear sensors with audio beep alerts) Trip Computer. There are lots of other third party extras for the roadster too.
The cruise control system will deactivate automatically when the brake is applied or the clutch is engaged. General installation process - Smart Roadster 2006> The installation process for the cruise control system involves accessing the area under the dashboard and the steering column by removing the knee-trim and steering column cowling.
These safety features help to ensure that cruise control operates reliably and safely, providing drivers with a more comfortable and stress-free driving experience. General installation process - for Smart Roadster 2003-2006 . Installing a cruise control system typically requires accessing the area under the dashboard and steering column.
The Smart Roadster's TRIDION safety cell is available in black, or in silver for an extra charge. The body panels are available in the colours jack black, shine yellow and spice red. ... A comfort package available as an option consists of cruise control, electric power steering and a trip computer. Useful information can be called up on its ...
Smart Roadster Cruise Control stalk also for the fortwo cabrio. SMART. N74. €177.50 incl. VAT - €146.69 excl. VAT. Smart Roadster Cruise Control Requires further programming to activate cruise control (additional cost involved). Add to cart ...
Plug this connector into the small socket on the cruise control stick. Push the cruise control stalk back into place. Clip the two sections of the dash back together before securing in place with the Torx screws. Push the frame back into place around the speedo. For the finishing touch, you need to remove the end cap from the old wiper stalk.
Smart Roadster Cruise Control stalk also for the fortwo cabrio. SMART. N74. €177.50 incl. VAT - €146.69 excl. VAT. Smart Roadster Cruise Control Requires further programming to activate cruise control (additional cost involved). ... Smart Roadster Airbag ECU Control Unit Sensor for vehicles with seat airbags Add to cart 1 ...
Smart Roadster Airbag ECU Control Unit Sensor for vehicles with seat airbags Add to cart On sale! ... Smart Roadster (Coupe) 452 Cruise Control stalk. SMART. MARGE-27. €145.00 €155.00 incl. VAT - €145.00 excl. VAT. Smart Roadster Cruise Control Requires further programming to activate cruise control (additional cost involved). ...
1 Smart Roadster Project: Setting up Drive-by-Wire or How to Remote-Control your Car Joachim Schr¨oder, Udo Mu¨ller, Rud¨ iger Dillmann Institute of Computer Science and Engineering.
Fitting The Cruise Control Stalk. Firstly you need to get a cruise control stalk from smart. Fortwo Coupe stalk number 001 2539 V004 C96A 00 (thanks J500ANT). Please be aware, this is only for the 700cc fortwo fortwo and Roadster. Remove the 4 Torx10 screws from under the speedo pod. Get your fingers in the front lip and lift the speedo up to ...
To add cruise control to you smart is a relativity inexpensive upgrade for some smart cars . 700cc fortwo 2003-2007 and roadster models Cruise control and limiter functions are easily added to these smarts provided you already have Soft touch (auto). Prices start from £220 +vat to supply and fit a new wiper stalk and perform the relevant ...
Reference:: SKs-450-Int-0174. Condition: New product. Kit Cruise Control Smart ForTwo 450 Roadster 452 to drive with more comfort. Ask a question for this product. Print. 402,60 € tax incl. £ 348.55. $423.00. Kit Cruise Control Smart ForTwo 450 Roadster 452.
Smart Roadster (Coupe) 452 Cruise Control stalk. Reference MARGE-27. €145.00 €155.00-€10.00. incl. VAT-€145.00 excl. VAT. Smart Roadster Cruise Control. Requires further programming to activate cruise control (additional cost involved). Add to cart ...
Get in touch with us. 2006 S Main St. Moscow, Idaho 83843. USA. Mon - Thurs, 8am - 4pm PST. (208) 892-0764. Module rebuilds for darn near everything: ABS Modules, Climate Control Modules, Instrument Clusters, Power Accessories, Powertrain modules and more.
Buy high quality lift kits & autobuffers for Smart Roadster 20-40mm at the best price with free worldwide shipping. High quality lift kits (leveling kits) & autobuffers (coil spring spacer) from the manufacturer for most car models in stock. Please select your car generation. Smart Roadster (2002 to 2006)
New and used Smart Roadster for sale in Moscow, Kansas on Facebook Marketplace. Find great deals and sell your items for free.
Smart Fortwo 450 Cruise Control stalk will also fit in roadster 452. €168.95. incl. VAT - €139.63 excl. VAT. Add to cart. On sale!
2. Tell the bus driver that you will be loading your bike. Load your bike from the curb or in front of the bus. Do not step into oncoming traffic. 3. Unlatch and pull down the bike rack. Use one hand to squeeze the bike rack handle, release the latch, and fold down the rack. Hold your bike with your other hand.
Smart Fortwo 450 Cruise Control Requires further programming to activate cruise control (additional cost involved). Phone: +31852007995. Email: [email protected]. English . English; Nederlands; Deutsch; ... Smart Roadster Cruise Control stalk also for the fortwo cabrio. SMART. N74. €177.50