- PC Peripherals
- PC Components
- RAM Speed Calculator
- Mouse DPI Calculator
- PPI Calculator
- Mouse eDPI Calculator

How to Fix Pre-travel on Mice

Pre-travel on your mouse buttons is usually a tiny problem most people can ignore as long as the mouse itself has a great shape or performs well for them. Pre-travel does not impact the way you play so you can just live with it, but in case you want the perfect click experience then you can use a simple mod to get rid of pre-travel.
What Is Pre-travel
Pre-travel on a mouse click means that there is a certain distance between the physical mouse button and the switch on your mouse. This means you need to push your buttons down for a certain period of time before your click actuates.
This is not a huge issue, but it will cause your mouse clicks to feel mushy and less responsive compared to a fully dialed-in click that you can feel as soon as you press the mouse button down.
Fixing Pre-travel
To fix pre-travel you can pray to the QC gods so that your mouse comes perfect, or you can try using a different switch in your mouse that is taller. However, a simpler way to remove the space between your click and the switch is by adding PTFE/aluminum tape to cover the gap.

Mod done on my HSK Pro 4K
This procedure is extremely simple since all you need to do is to open your mouse up and start stacking tiny pieces of alu-tape or PTFE tape to where the switch plungers and mouse main clicks meet. While doing this you need to be careful to not add too much tape since then there will not be enough space between the switches and the buttons resulting in a stuck click.
I would advise you to put the mouse back together and test the clicks each time you add a layer to make sure it all fits well. You need to also be careful because sometimes one click will need more tape or less tape depending on the shape of the clicks, the height of the switches, etc. In short, you need to adjust each click individually to make sure there is minimal space between the switch plunger and the physical mouse button on your main clicks.
If done correctly you will get to enjoy a virtually flawless crispy click every time you go to click on an enemy’s head.
Post navigation
Leave a reply cancel reply.
Your email address will not be published. Required fields are marked *
Save my name, email, and website in this browser for the next time I comment.

What is Gaming Mouse Button Pre-Travel and How to Fix It

Are you experiencing pre-travel in your gaming mouse button? Tired of searching for a fix? Look no further! We have a simple and effective solution that can work for any type of mouse. All you need is aluminum foil tape and a few basic tools.
Let's dive in and fix that pre-travel issue once and for all.
Understanding Mouse Button Pre-Travel
Mouse button pre-travel is like the calm before the storm. It's that little moment between pressing down on a Mouse button and when the click actually gets recognized by your computer. In competitive gaming, this split-second can be the difference between victory and defeat.

The Effects on Competitive Gaming
When you’re in the midst of an intense gaming session, you need your gear to respond faster than a cheetah chasing its prey. Pre-travel can slow down your reaction time, and in gaming, milliseconds matter.
Why Pre-Travel Matters
Imagine trying to take a shot in an FPS game, and there's a slight delay before your weapon fires. That delay might not seem like much, but it can mean the enemy gets the first shot. A Mouse with less pre-travel ensures that your clicks are on point.
Identifying If You Have Pre-Travel Issues
To spot pre-travel, click the Mouse button and pay attention to how quickly it responds. Does it feel sluggish? Does it make you want to shout? If so, you might have a pre-travel issue.
Different Types of Mouse Buttons
Mechanical vs. optical.
- The mechanical switches are common, but they might have more pre-travel because they rely on physical contact.
- The optical switches use light beams to register clicks, making them faster and less prone to pre-travel.
The Science Behind the Click
How buttons register clicks.
It’s like a high-five! When you press a button, it’s like your hand moving to meet your friend’s hand. The click registers when your hands actually meet.
Methods to Fix Pre-Travel
Adjusting button tension.
This can be done by opening the Mouse and tweaking the spring tension for mechanical switches.
Replacing Switches
For a long-term fix, replacing mechanical switches with optical ones can reduce pre-travel.
Using Mouse Software
Some mice have Software that allows you to adjust the pre-travel. It's like having a personal trainer for your mouse!
Prevention is Better Than Cure
Keep your Mouse clean and up-to-date with the latest Firmware to reduce pre-travel issues.
Choosing the Right Gaming Mouse
Pick a mouse with low pre-travel to begin with. Look for optical switches and adjustable tension settings.
Summing Up the Quest
We’ve embarked on a quest to eliminate the dreaded pre-travel. Now you’re equipped with the sword and shield (knowledge) to combat any pre-travel issues and be the gaming warrior you were meant to be!
Snap Tap: Revolutionizing Mechanical Gaming Keyboards
Detailed guide on subpixels in gaming monitors, hyperx ngenuity optimization and troubleshooting: a comprehensive guide.
How-To Geek
Stop wasting money on new mice, fixing your old one is easy.

Your changes have been saved
Email is sent
Email has already been sent
Please verify your email address.
You’ve reached your account maximum for followed topics.
5 Great Reasons to Unplug Your Computer Overnight
Say goodbye to samsung messages, why are sd cards declining when they're so awesome, key takeaways.
- Gaming mice commonly face button issues, and parts wear out after a few years.
- Replacement parts for high-end mice are surprisingly affordable and allow for upgrades that extend the mouse's lifespan.
- Repairing your mouse is easy and can be done with a few simple tools.
If you regularly change your gaming mice because they keep breaking, you're not alone. People often think of computer mice as consumable items, but I'm here to tell you that there's still plenty of life left in your aging mouse, provided you're willing to spend a few bucks and an hour of your time.
Buying a New Mouse Won’t Solve the Problem
Gaming mice are generally built to withstand heavy use. Even so, very few of them can handle years of regular use without developing issues over time. I've had two Logitech G502s and a Gigabyte mouse, and all three started developing the notorious "double-clicking" issue (where one mouse clicks registers as two) after a couple of years.
Not to mention that the rubberized side grips wear out over time. The only way to prevent or fix this is by using mouse grip tape , but I'm not a fan of this. Grip tape doesn't feel as nice to use, and it seems to accumulate dirt more easily.
In some cases, computer mice are actually designed with " planned obsolescence " in mind, as the manufacturer can't make money if you keep using the same mouse for a decade. A good example of planned obsolescence in computer mice is the use of inferior micro switches like the mushy-feeling Chinese Omrons. Additionally, an imperfect mouse can slip through quality control and get sold to an unlucky customer, though a warranty can protect you in those situations.
If your mouse starts to develop issues after the warranty expires, you're left with the decision of either fixing the mouse or just buying a new one. Many gamers opt to spend their hard-earned cash on a new mouse, either sticking to the same model or trying their luck with a different one.
In the former case, the mouse will inevitably develop the same issue, while in the latter, you might end up with a different set of problems. Not to mention that you'll be forced to adapt to a new mouse shape that will ruin some of your muscle memory and potentially make you feel uncomfortable with your preferred mouse grip style . Once you find your perfect mouse , you'll want to continue using it. So, rather than spending money on a replacement mouse, consider repairing (and probably upgrading) it instead.
Parts for High-End Mice Are Surprisingly Cheap
When a mouse costs upwards of $100, you might assume that replacement parts are equally expensive. Fortunately, that's not the case at all, as you can easily find official and third-party replacement parts for popular mice that cost a fraction of the mouse's total price. A large part of a mouse's price is actually due to R&D costs, packaging, shipping, and branding, rather than the cost of the individual parts.
Micro switches are among the most important components, but they only cost $2–3 a piece, or less if you buy multiple pieces. TTC Dustproof 80M switches are arguably the best micro switches in the world, and a pack of four only costs $7.99 at the time of writing.
Mouse motherboards, plastic shells and buttons, cables, and mouse skates are also quite affordable and readily available from online retail stores. If you only need a new shell and a couple of switches for the left and right mouse buttons, it'll only cost $10–15, whereas a new (good) mouse costs anywhere from $30 to over $100. I replaced my G502 Lightspeed's plastic shell with a $10 replacement from Aliexpress, and my mouse now looks and feels as good as new (minus the acetone-damaged buttons).
Upgrade Your Mouse While Minimizing E-Waste
Repairing your mouse isn't just about fixing it—it's also about upgrading it with higher-quality replacement parts that put the original to shame. You can have fun experimenting with different micro switches until you find the one that is your favorite. I've tried a few before eventually landing on the Huano Blue Shell Pink Dot , which has a somewhat heavy actuation force and firm tactile feel. They're miles better than the soft, mushy Omrons that come standard on the G502.
Mouse switches aren't the only potential custom upgrade, though. PTFE mouse skates (feet) with curved edges are another cheap yet meaningful upgrade that allows your mouse to glide smoothly across your mouse pad.
Many mouse manufacturers have now shifted to white "virgin-grade" PTFE, but if your mouse uses dyed or treated mouse skates (or they're just worn out), this is a cheap and easy upgrade. Make sure the new pads have curved edges to reduce dust accumulation.
Thanks to these small upgrades, you'll be able to keep the mouse for a few more years and minimize your carbon footprint. Computer peripherals are thrown away all the time, and if they don't get recycled correctly, they end up as dangerous e-waste . About 30% of all plastic in the ocean is made up of old electronic products, which wreaks havoc on fragile ecosystems. To make sure your computer mice (and other devices) don't hurt our environment, make sure to dispose of them responsibly .
Even if your mouse is standing on its last mousy feet, and you wish to get rid of it, you could always try to repair it and give it to someone who needs it. I did that with my old G502 because I wanted to upgrade to a wireless model . The mouse is now with my fiancée, and it makes for a much better mouse for work than some cheap mouse she'd buy in a store.
Repairing Your Mouse Isn’t as Hard as You Think
I've talked about fixing and upgrading mice a bunch, so if you're still reading this, I've hopefully managed to convince you to give it a shot. So, how do you actually go about fixing a mouse? The good news is that most mouse repairs are surprisingly easy to do, even without prior experience.
For instance, installing new mouse skates involves carefully peeling off the old ones, cleaning up glue residue, and sticking on new ones. Another easy fix you can try is adding aluminum tape to the buttons to reduce pre-travel (the distance between the plastic mouse button and the switch), as demonstrated by the YouTuber Good Enough Tech Reviews .
You don't need any advanced tools to repair your mouse. The iFixit Essential Toolkit has all the screwdriver bits and pry tools you need to take apart most mice. If you wish to replace the micro switches, you'll need to learn how to solder , but you could also grab a mouse circuit board with hot-swappable switches, which allows you to swap the switches without soldering, provided the part exists for your model. Still, even without a hot-swappable board, replacing switches isn't that difficult—even I can do it!
For any mouse repair that involves a complete teardown, you should follow a detailed guide, especially if it's your first time doing it. Some mice might have tabs or screws in places you didn't expect, and if you try to pry a piece open with force, you might end up cracking the plastic and damaging the mouse permanently. iFixit has a bunch of free guides, but other general-purpose platforms like Reddit and YouTube also have helpful guides, anecdotes, pictures, and videos that make mouse repairs easy.
Fixing your mouse is a great way to upgrade it while also saving money. However, when some mice are irreparably broken , especially if replacement parts aren't available, so make sure to pick the right replacement mouse . Don't forget to fix your new mouse if it breaks a few years down the road!
- Reviews TV REVIEWS v1.11 HEADPHONES REVIEWS v1.8 MONITOR REVIEWS v2.0 SOUNDBAR REVIEWS v1.3 MOUSE REVIEWS v1.5 KEYBOARD REVIEWS v1.3.1 PRINTER REVIEWS v1.2 VACUUM REVIEWS v1.3 KEYBOARD SWITCH REVIEWS v1.0 AIR PURIFIER REVIEWS v1.0 DEHUMIDIFIER REVIEWS v1.0 MICROWAVE REVIEWS v1.0 BLENDER REVIEWS v1.0 TOASTER REVIEWS v1.0 ROUTER REVIEWS v0.8 PROJECTOR REVIEWS v0.9 SPEAKER REVIEWS v0.8 CAMERA REVIEWS v0.12.1 LAPTOP REVIEWS v0.8.2
- What's New COMPUTER Monitors, Mice, Keyboards, Printers, Routers, Keyboard Switches, and Laptops HOME ENTERTAINMENT TVs, Soundbars, and Projectors AUDIO Headphones and Speakers HOME Vacuums, Dehumidifiers, Mattresses, Humidifiers, and Air Purifiers PHOTO & VIDEO Cameras KITCHEN Toasters, Air Fryers, Blenders, and Microwaves REVIEW PIPELINE See upcoming reviews, cast your vote, and suggest products
- Newsletters
- Tactile Force And Travel Distance
- Table of Contents
The Problem
Aspects we won't be addressing, proof of success, choosing the testing point, comparing the angle at which we test the button press, observing actuation abnormalities, changing from actuation force to tactile force, influence of mouse construction on actuation, can we suggest a mouse based on tactile force and grip style, bounce and debounce, how we deal with the bouncing, switch vs. mouse construction, comparing tactile force variance, impact of test variance on tactile force, test bench 1.5 - tactile force, pre-travel, and total travel r&d article.
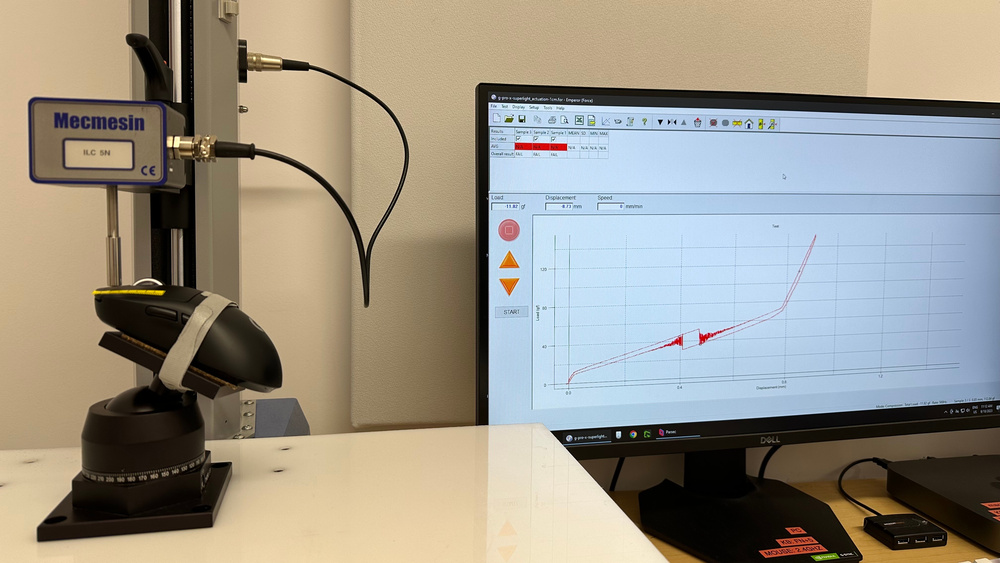
This article investigates our process for creating the new "Main Button" mouse test. This test aims to provide actuation data to help you decide which mouse is right for you. Using a force testing machine, we test four points three times each along the main mouse button and provide an actuation graph, a force/distance graph, and switch information, including type and model. We created this test using data from over 24 mice, analyzing aspects like actuation abnormalities, influence of mouse construction, debounce, and more. Despite some limitations, the test provides important data for making informed decisions based on your actuation preferences.
Problem Definition
We've identified that our mouse reviews are missing important information about switches and main mouse button actuation. Many people want to know what type of switches (and potentially the exact switch model) the main buttons use, as well as the tactile force and distances associated with the main button click. This test bench update aims to provide the main mouse button actuation data and switch information. The aim is to provide information to help people better decide which mouse is right for them.
Mouse enthusiasts talk about and compare different mouse switches, which shows that they would benefit from being provided with this information. Many of these people would like to know the tactile force of a mouse button before purchasing. This can be because of preference, injury, or even disability. Below is a comment from RtingsUser166277, who suggests we include actuation and switch information in our review.

Other threads requesting mouse actuation force:
- RTINGS.com Thread 1 (screenshot above)
- RTINGS.com Thread 2
- Reddit Thread 1
- Reddit Thread 2
Note: Most of the enthusiast mouse community online refers to what we call 'tactile' force as 'actuation' force. We cover this in a later section and explore why we chose to use tactile force.
Other common complaints are about specific mice and how the main button performs. A good example is the LAMZU Atlantis, where many owners have identified a small initial "click" during the pre-travel movement before the click that actuates the mouse. Figure 2 shows a Reddit user who experienced this issue with their LAMZU Atlantis. One of the aims of creating our new actuation test is to be able to highlight these abnormal characteristics.

Of the comments/feedback, one aspect that we won't cover in this update is the issue of double clicks. This issue is often specifically raised when discussing mice with mechanical switches; we aren't addressing this issue in this update because this relates more to quality control than the actual mouse characteristics.
Another aspect we won't address in this test bench update is the switch lifespan rating. Often, manufacturers will advertise a certain number of clicks that a switch is rated to last. Since this is a completely different test, we decided to leave it to the side for now.
For this test to be successful, we'd like to show the differentiation between mice that typically have complaints about tactile force or travel distances. We aim to be able to take a mouse that users online have flagged as having abnormal main button actuation and observe the differences in the results. Examples include mice that have been flagged as having a lot of pre/total travel, unusually high/low tactile forces, or issues like the LAMZU Atlantis pre-travel "click." Assuming our mouse units exhibit the issues people have complained about, the graphs should show these results.
Explorations
Our original solution for the actuation test was to measure the force/distance values at 1cm from the front of the button. This was an arbitrary point chosen because it was close to where most people would place their finger on a "standard" size mouse. The problem is that mice come in many different shapes and sizes, and people have different hand sizes and grip styles. All of these factors mean that using one point to characterize the actuation of a mouse button is rarely useful. Comparing two mice at 1 cm from the front button might be meaningless if the mice are different sizes. By choosing four points, we can evaluate how the mouse button performs over most of the usable area.

This provides each person with information specific to how they would use the mouse. It also means we can make an informed guess as to how the mouse will perform anywhere between each point using graphs (linear approximation). Regardless of hand size, grip, or mouse size, the information about all actuation points is made available so you can make the best decision for your needs.
We considered two approaches for what angle to use for actuation testing: mouse flat and button press straight down or mouse at an angle and perpendicular force applied to the button. We chose to go with the mouse at an angle with perpendicular force applied to the button because we believe it more accurately represents how most people use their fingers to press a mouse button in real-world uses. Additionally, since the load cell is designed for force testing along the vertical axis of the probe, the perpendicular method allows for all the tactile force to be applied to that axis.

We determined the solution we chose for testing the main button actuation by combining our learnings to create a test that best evaluates how the mouse button will perform. We test each mouse by strapping it to a plate with a ball joint to angle the mouse properly. Using tape with measurements, we test points from 1 to 4 cm from the front of the button, with each point being tested three times. We use our Mecmesin MultiTest-i force testing machine following a similar process to how we test keyboard actuation.
The raw actuation data is collected for each point and used to create two graphs: an actuation graph and a force/distance graph. The actuation graphs are made with the raw actuation data from the first sample at 1 cm from the front of the button. The tactile point is highlighted to make it easy to read the force/distance needed to actuate the main button. The force/distance graphs are made by plotting the average tactile force and pre/total travel distances for each point.

We also include the "Switch Type" and "Switch Model" comparisons. This provides information about the mouse buttons to help people who like/dislike specific switches or their characteristics.
Data Analysis
One important goal of this test is to see if we can observe abnormalities in tactile force/distance for mice that have had complaints. The best example is the LAMZU Atlantis, which has had multiple complaints about a small "click" during pre-travel (right when the main button is touched). We could feel the same "click" in our unit that many online have complained about. When we collected the actuation data, the "click" is visible at every spot we tested along the length of the main button. You can see it below on the LAMZU Atlantis press (red curve), where it shows up as a small bump. In comparison, the Endgame Gear XM1r press (yellow curve) does not have the same bump. These graph results are consistent with how our units feel and are a sign that our test can catch even small abnormalities.

While the actuation point and tactile point of keyboard switches tend to be farther apart, they're typically much closer together for mouse microswitches. Below are examples of typical keyboard (tactile) and mouse actuation graphs. For mice, the actuation point happens immediately after the tactile point. The same goes for the reset point, which happens immediately after the switch pops back up. The most important point along the mouse actuation curve is the tactile point since it's the maximum force needed to overcome to actuate the mouse. Since the time and distance are so small and the force is always lower going from the tactile point to the point of actuation, we can treat the tactile point as the force required to actuate the mouse.

Additionally, since there's bouncing in the graph around the actuation point, the force value can vary from test to test. Some actuation points might register at the peak of one of the bounces, while others could register at the bottom (more information on this bouncing in the following sections).
For all the reasons above, we removed the actuation and reset points from the mouse actuation graphs and only retained the tactile force point labeled. Note that we've opted to use the term "tactile force" in relation to our focus on the tactile point. We recognize this term is likely more often referred to as "actuation force" within the broader online mouse community. However, we think the graph is clear enough to indicate what the tactile force is and why it's relevant.
Comparing mice with the same switches and (almost) the same build
Two of the mice we tested have a very similar build and use the same switches (the HyperX Pulsefire Haste 2 and the HyperX Pulsefire Haste 2 Wireless.) Since there's very little apparent difference between these two mice apart from their connectivity options, we theorized there may not be much variation in the Main Button test results. However, when we compare the actuation results of these two mice in the table and reviews below, there is a small but noticeable difference between the two mice.

These differences are surprising since they use the same switches, and their shape/build is very similar. The differences could be attributed to multiple factors: switch-to-switch variance, small differences in mouse build (same shape, different internals), or small variance in testing conditions. We looked into all these influences to determine their impact.
If we look at the teardown photos below, we can see that the internal structure of the two mice are slightly different. The Haste 2 Wireless has a battery mounted towards the center and a slightly different main PCB layout. Despite that, the switch position looks the same for both models, and the top shell is identical for both models. It's possible that the small differences in internal structure could be some of the reasons for the slight difference in actuation characteristics.

Another possibility for the difference in actuation characteristics may be a variance in our testing procedure. When we test the actuation, we take three samples of each point. Because of this, we can examine the standard deviation in the tactile force of each point to see how closely our test can be repeated. The largest standard deviation is ~0.94 gf, which is much less than the difference of 4.15 gf we see between the wired and wireless buttons.

Despite the small standard deviations, some differences between the Haste 2 mice could be from testing variance. If we look at the force/distance graph for the Pulsefire Haste 2 Wireless below, we can see that from 1 to 2 cm, the tactile force increases from approximately 57 gf to 72 gf, respectively. It's a 15 gf increase over a 1 cm distance. Assuming it's linear from 1 to 2 cm (this isn't necessarily true, but is a close approximation), the result is a 1.5 gf/mm change. If we do the same analysis on the wired Pulsefire Haste 2, we get about 1.1 gf/mm. For this reason, small variances due to human error, like the button not being perfectly perpendicular to the probe or the test point being slightly closer/farther from the desired point, can cause the results to be slightly impacted.

Another explanation for the difference between the two Haste 2 mice is that the switches have some inconsistencies between them. To test this, we took the Haste 2 and Haste 2 Wireless and tested the left and right mouse buttons at 1 cm from the front of the button. This should be a fair comparison because both mice are symmetrical, so the left and right clicks should be the same. You can see the actuation graphs for this test and a summarized table below.

Although some of this variation could be due to small changes in our testing setup, it's very unlikely that it's responsible for 11 gf of difference. This difference between left and right mouse actuation results for the Haste 2 are likely due to switch variation. We don't have a large enough sample size to say whether this is an expected variation between switches, but this does explain why we see small differences in our test results between the two mice.
We also tested the ASUS ROG Chakram core to evaluate the variance between the left and right switches. The Chakram Core has hot-swappable switches, so, to eliminate as many variables as possible, we tested both switches in the left switch socket. We also removed the button cover to test directly on the switch. The switches in this mouse are the Omron D2FC-F-K (50M).

We can see from the actuation graphs that there's a very small but noticeable difference between the two switches. It's just another example of how switches can vary in terms of actuation characteristics and how the actuation characteristics can differ even between left- and right-click buttons on the same mouse. Differences this small are very minor and likely aren't noticeable when using the mouse normally.

These investigations are a good indicator that our test is accurate but sensitive to small changes. This can be good for differentiating minor differences between two mice (or two mouse buttons); however, there's a risk that reading too far into results can generate incorrect conclusions. Small differences like the ones seen in the Omron D2FC-F-K (50M) comparison above are visible but very difficult to perceive when using the mouse. Conversely, differences like the one shown in the Haste 2 could be distracting for some enthusiasts.
Comparing mice with the same switches but different build
An important aspect to consider when purchasing a mouse isn't only the switch but how the switch performs within that mouse. Not all switches will perform equally, given a different mouse body. Switches each have specific characteristics (like tactile force and travel distances), but how the switch is implemented will impact to what degree these characteristics are felt.
To demonstrate, we can compare several mice that use the same switches. The Razer Basilisk V3 Pro, Razer Cobra, and the Razer Viper V2 Pro all use Razer Optical Mouse Switch Gen 3 switches, but there are identifiable differences in the click characteristics between them. The graphs below show that the tactile force, pre-travel, and total travel all vary by a sizeable amount. Some of this variation may be due to switch variance, but it's unlikely that it would be this significant for all three mice. It's more likely that the mouse construction and how the switch is implemented impact how the main button feels and performs.

Because of this variance, it's difficult to recommend a specific switch without knowing how that switch will perform in a specific mouse body. Just because a switch has a specific tactile force or displacement doesn't mean those characteristics will translate when implemented into a given mouse.
Other features that could affect tactile force
One design feature influencing actuation characteristics is the hinge placement and whether a spring is used to keep the button against the switch. Since having a gap between the mouse button and the switch can feel distracting, mice manufacturers use different ways to keep the button against the switch.
For example, both the Razer Viper 8KHz and the ASUS ROG Chakram Core have springs that keep the mouse button pressed against the switch; however, they operate slightly differently. These springs push the mouse button down slightly in both cases, but depending on spring strength, location, and angle, the force of these springs can impact actuation results differently.

Another method manufacturers use to keep the mouse button against the switch is by designing the button shell in one piece instead of having the buttons hinge. Mice like the BenQ Zowie FK1-B are designed like this.

As mentioned, depending on your hand size and grip style, certain mice may be more or less suited to you based on tactile force where your fingers rest. Using the distance/force actuation graphs, we can identify the tactile force required to actuate the main button, depending on where you rest your finger. This can help recommend a mouse for different hand sizes, grip styles, and tactile force preferences. Using both the Hand Size Recommendation box and the new Main Button box together provides the best indication of how the mouse main button performs.
One great example is the comparison between the Logitech MX Master 3S and the Fantech Aria XD7. When we compare the tactile force/displacement graph for these two mice, we see that the MX Master 3S is lower in tactile force for any given point. However, that doesn't tell the whole story.

The Logitech MX Master 3S has a much larger body than the Fantech Aria XD7, which can be seen using our Shape Compare Tool. As a result, a person will likely be placing their fingers further from the front of the main button on the MX Master 3S for a given hand size and grip. A great example of this can be seen using the Hand Size Recommendation box.

Someone with an average hand size using a claw grip may rest their finger naturally about 3 cm from the front of the button on the MX Master 3S, while that same person may rest their finger closer to 1 cm from the front of the XD7. If we compare the results for this person, the Aria XD7 would have lower tactile force than the MX Master 3S.

For this reason, we can't directly compare the tactile force/distance graphs from mouse to mouse. Despite this, we can provide all the information to help you make the best decision using our hand size recommendation and tactile force/displacement graphs. If you know your hand size/grip style and know what type of main button actuation you want, our tools will be able to help you choose the right mouse for you.
What's the issue?
As seen in almost any of our actuation graphs, there are visible oscillations just after the tactile and reset points. In this article, we refer to these oscillations as bouncing, which isn't to be confused with debounce. This bouncing isn't something you feel when you press a mouse button, but it does raise the question of where it comes from.

In theory, mice using optical switches should have no need for traditional debounce. Mice using mechanical switches exhibit electrical bouncing, which means they require debounce to operate properly. This is because mechanical switches are actuated when a metal spring plate hits a contact. The spring plate bounces multiple times in a short period of time, which results in multiple "clicks" being registered. Debounce is therefore required for the mouse to operate properly and remove the extra inputs.
Since optical switches actuate using a gate to block a beam of infrared light instead of the contact from the metal spring plate, there is no bouncing in the electrical signal, and therefore no need for debounce (generally). There are some indications that debounce can be used in optical mice to avoid slam-clicks, but this isn't covered in this article.
![Comparison between traditional mechanical switches and Razer optical switches [2]](https://www.rtings.com/assets/pages/hi4H3kUu/razer-optical-vs-mechanical-diagram-medium.jpg "mouse pre travel fix")
Oscilloscope testing - what did we test and why?
We selected the Razer Viper 8KHz, which uses optical switches, and the Zowie FK1-B, which uses mechanical switches, and connected both to an oscilloscope to see if we could observe the bouncing that we see in the actuation graphs. The goal was to see if the electrical bouncing (or lack thereof) is connected to the physical bouncing in our actuation graphs. We tested the actuation of the mice at various probe speeds ranging from 5 mm/min up to 100 mm/min. We also looked at the oscilloscope reading for when the mouse was pressed by a human at a normal speed (much faster than the force testing machine).

Optical mouse oscilloscope results
As expected, the oscilloscope readings from the optical switches on the Razer Viper 8KHz did not show electrical bouncing. As speed decreased, they did show a flatter curve. This is likely because the gate that blocks the infrared light is blocking/exposing the photodiode at a slower rate. The following two pictures are oscilloscope readings of the Razer Viper 8KHz mouse.

We don't see any bouncing in the electrical signal in either situation that would require debounce. The oscillations we see are constant and relatively low amplitude (~0.7 V). They also stay constant when holding the mouse button down for a long period. If this were due to electrical bounce, we would expect that these oscillations would be higher amplitude and stop shortly after actuation. It's likely that the oscillations we see are electrical noise.
Mechanical mouse oscilloscope results
For the BenQ Zowie FK-B, which uses mechanical switches, the oscilloscope readings were very similar to each other (regardless of how fast the button is pressed). The results can be seen below, where the oscilloscope reading when pressed by a human (relatively fast) is almost the same as when pressed by the machine at 30 mm/min (relatively slow).

All testing speeds we tried produced bouncing for a period of about 500 µs (equal to 0.0005 seconds). When we looked at the actuation graph data from the test at 30 mm/min, the physical bouncing lasts for about 0.05 seconds (this looked like a typical amount of bouncing compared to other mice with mechanical switches).
That means that the electrical bouncing lasted for about 1/100 th of the time that the force tester registered bouncing. This likely means that the amount of bouncing we see in the actuation graph does not indicate the amount of electrical bounce we will see in a switch.
What does this mean for our test?
As expected, our testing shows that optical switches show no sign of electrical bouncing, while mechanical switches do. Despite this, the actuation curves for most optical mice still show physical bouncing after the tactile point, much like the Razer Viper 8KHz below. For the slower sample, the bouncing is much less pronounced. However, it's still there (more on this in later sections). We, therefore, needed to look more into the bouncing and how to deal with it.

Limitation of our testing rig
One limitation in our testing is that the testing probe is made of metal, which doesn't fully represent how a finger reacts to pressing a mouse button. The metal probe is good for accurately recording the press distance, but it can potentially contribute to the bouncing we see. Our theory was that since the probe is a rigid object moving at a constant speed, the mouse button could bounce back and forth against the probe when the spring plate buckles, causing the force readings to bounce. We tried observing the bouncing under slow motion (960 fps), but we couldn't observe any bouncing.
Testing with a more finger-like probe
To check whether the bouncing was due to our probe being rigid, we used a soft foam insert between the probe and mouse button to see how it would affect the results, the goal being to mimic the softness of a human finger. We performed this test on the Vaxee XE, which has mechanical switches and demonstrated very prominent bouncing.

The results reveal that the bouncing is only slightly dampened with the foam insert, which shows that the rigid probe likely isn't the primary cause of the bouncing. This testing method also introduced more pre- and post-travel since the foam compressed. For this reason, we stuck with the metal probe since the bouncing results weren't affected.

Is it the mouse button or the switch bouncing?
To better understand the bouncing, we tested a mechanical switch on its own. We used the ASUS ROG Chakram Core and removed the mouse button covers to reveal the bare Omron D2FC-F-K (50M) mechanical switch.
Below, we can compare the results to a normal click on the Chakram Core with the button cover to see its influence on the physical bouncing. With the button cover on (yellow and green curves), the displacement is increased; however, this is likely due to testing at a slightly different spot along the mouse. The more important takeaway from the graph is that there was still physical bouncing at the tactile and reset points. The same bouncing is visible when we look at the test directly on the Omron D2FC-F-K (50M) switch (red and blue curves). Since both samples seem to bounce a similar amount, we can conclude that the button cover does not play a large role in the amount of physical bouncing we see.

Influence of testing speed on bounce and actuation graphs
Since we can safely assume the bouncing we see isn't related to debounce and shouldn't be interpreted as such, our goal was to test the mice using a speed fast enough not to slow testing but slow enough to reduce the amount of bouncing present.
When we tested at very low speeds (around 5 mm/min), the "smooth" portions of the curves had many small bumps and were generally less smooth than the 30 mm/min sample. As mentioned above, the bouncing is less pronounced but still clearly visible. Regardless of what speed we chose, there was always some amount of bouncing in the actuation graphs. Additionally, since there are more lines of data, the slower tests would take longer to load the graphs when viewed online.

The bouncing was much more pronounced when we chose a faster speed, like 100 mm/min. For this reason, we chose 30 mm/min as our final testing speed, as it provides a good balance between low testing time, smooth curves, and limited bouncing.

Test Variance And Limits
Making claims about how an individual switch performs can be hard to validate. Despite there being many different mouse switches with different tactile forces and characteristics, the construction of the mouse still plays a role in actuation. Since the construction of the mouse button itself will influence the results, it can be hard to determine whether the results are due to switch or mouse construction. For this reason, our test is best for evaluating a specific mouse with a specific switch, not one or the other.
Although some people might be very sensitive to mouse tactile force, others might have a hard time differentiating between mice by tactile force alone. When we gave the HyperX Pulsefire Haste 2 to coworkers around the office, some could identify the 11 gf difference between the left and right mouse buttons, while others couldn't. For people with more sensitivity to actuation force, a difference of about 10 gf is around the limit of where it's noticeable.
If we assume that the force change between points is linear like we did with the HyperX Pulsefire Haste 2 and Pulsefire Haste 2 Wireless in a previous section, we can say that the variation in force due to human error is likely about 1.5 gf/mm. We can position the force testing probe to within about plus-or-minus 1 mm with accuracy, so the variance due to human error is about 3 gf. In addition, our largest standard deviation when testing the Haste 2 mice was about 1 gf, which we can assume is representative of all our mice tested. Altogether, we get a test variance of about 4 gf, significantly below the threshold at which the difference may be perceptible.

We don't currently know how much (if any) of the bouncing is caused by our testing probe and how much is due to switch bounce. However , we can conclude that the amount of physical bouncing shouldn't be interpreted as 'debounce'. We have no evidence that they're directly correlated. We also know that the physical bouncing isn't increased/decreased by the button cover.
Though we don't know the cause of the physical bouncing, it's possible that the spring plate could be vibrating after press/release enough to be registered by our testing machine. From the diagrams, it looks like many optical switches also use a spring plate, similar to mechanical switches. Since it's not responsible for the electrical signal in optical switches, it doesn't electrically bounce, which would explain why we only see physical bouncing with optical switches.
An important note on the bouncing is that no one in the office could detect (by hand) that there was any physical bouncing whatsoever. Even with a mouse like the Vaxee XE that exhibits significant bouncing, we couldn't feel the bouncing in hand. Although the mice have different feeling clicks, a more/less "bouncy" mouse was not distinguishable.
Looking back to the problem, our new test shows tactile force, total travel, and pre-travel for multiple points along the mouse. Furthermore, the tactile graph is precise enough to catch discrepancies like those found in the LAMZU Atlantis:
Overall, this test provides an indication of how the main button of a mouse feels and performs.
Pros and cons:
+ Relates well with the Hand Size Recommendation box to provide targeted information
+ Precise enough to catch discrepancies
+ Only minor variance in tactile force results due to test variance (~4 gf)
- Potential variation in results due to manufacturing variance between individual switches of the same make and model
[1] Reddit, rist0ph, "Second Atlantis with substantial M1 pre-travel", 4 February 2023. [Online]. https://www.reddit.com/r/MouseReview/comments/10tk7zo/second_atlantis_with_substantial_m1_pretravel/
[2] Razer, "Razer Optical Mouse Switches", 2023. [Online]. https://www.razer.com/technology/razer-optical-mouse-switch
Background and Identification
Additional information.
- Show Other Languages
Mouse Repair
You know them, you need them, they move your cursor around. Repair information for your nest of mice.
37 Categories
Logitech mouse, microsoft mouse, nager it mouse, razer mouse, cabstone wired optical mouse, engage wired optical mouse, hp fha-3510 wireless mouse, leap motion controller, mionix naos 5000 mouse, dell mo56uc, ge wired optical mouse, hp optical mouse, monoprice super slim optical usb mouse with dpi adjustment, pictek entry-level gaming mouse (ytgepc098ab-usae1), saitek cyborg v3, thermaltake theron plus, acer optical mouse, anker mouse, asus rog mouse, cherry gentix 4k, corsair mouse, hama urage mobile gaming mouse, harper gaming barrett wgm-07 vertical mouse, ihome bluetooth mac mouse - white (imac-m110w), jelly comb wirelress vertical mouse, kensington mouse, lenovo mouse, marsback zephyr pro, microsoft wheel mouse optical 1.1a, razer naga hex v1, redgear mouse, roccat mouse, rosewill neon m62, steelseries mouse, zerodate t26, replacement guides.

Feet And Grips

Mouse Cable

Mouse Paracord

Scroll Wheel

Tactile Switch (Scroll Wheel)

USB Connector

USB Type-A Cord
Disassembly Guides

PERIXX PERIMICE-719

How to Fix a Dirty Censor in a Corsair Harpoon RGB

How to Fix the Scroll Wheel of a Wired HP Mouse

How to fix jumpy scroll wheel of a computer mouse

How to fix slipping scroll wheel on the DELUX M618 mouse

Mouse Button Repair Technique

Mechanical Mouse Teardown
Popular Forum Questions
- Batteries (2)
- Feet and Legs (4)
- Screws and Bolts (4)
These are some common tools used to work on this device. You might not need every tool for every procedure.
6-in-1 Screwdriver
Heat Shrink Tubing Assortment
Soldering Iron 60w Hakko 503F
Soldering Workstation
Lead-Free Solder
Solder ROHS Lead Free Rosin Core
Phillips #0 Screwdriver
Phillips #00 Screwdriver
IA-3952 - Max Professional Consumable Isopropyl Alcohol
Cotton Swabs
TR10 Torx Security Screwdriver
Phillips #000 Screwdriver
iFixit Opening Picks (Set of 6)
iFixit Opening Tool
Mahi Driver Kit - 48 Bit Driver Kit
Mako Driver Kit - 64 Precision Bits
Precision Utility Knife
Phillips #1 Screwdriver
A computer mouse is a computer accessory that helps users control their cursor. The hand-held pointing device operates by detecting two-dimensional motion relative to a surface. A computer mouse is a relatively simple piece of hardware that traditionally includes buttons on top, a sensor on the bottom, and a scroll wheel.
The earliest known publication to use the term “mouse” was in 1965, in Bill English’s “Computer-Aided Display Control.” Though it was Douglas Engelbart who invented the mouse, Bill English helped create the prototype in 1964. In 1973, the Xerox Alto, a personal computer, was the first to utilize a mouse. In 1984, an updated version of the Macintosh Lisa Mouse was released.
There are several types of mice. The original type was the mechanical mouse. This was made up of a ball that rolls on the surface of the desk or mouse pad. X and Y rollers grip the ball and transfer movement, spinning an optical encoding disc that has holes through which infrared light shines. Sensors gather light pulses to convert to X and Y vectors. Since the release of these original track-ball style mice, many other mice styles have been developed, including: optical and laser mice, gaming mice, inertial and gyroscopic mice, 3D mice and ergonomic mice.
Mice can come in both wired and wireless options. There is a preference for a wired mouse when it comes to gaming because there can be lag and interference issues with a wireless gaming mouse. The wireless mouse typically operates via bluetooth or the 2.4 GHz wireless frequencies used for cordless phones and Wi-Fi internet.
- Mice on Wikipedia
- How Computer Mice Work (How Stuff Works article)
- Mice on Amazon
with 10 other contributors

Matthew Newsom
Member since: 01/05/10
39,960 Reputation
67 Guides authored
+44 more badges
Past 24 Hours: 83
Past 7 Days: 540
Past 30 Days: 2,566
All Time: 182,257
- Edit source
What is pre-travel and why it happens
Pre-travel happens when the mouse button plunger and the switch have some play between them. It can be fixed by putting something between the mouse button plunger and the switch so they are tighter together and in the process eliminate the play between them.
What you need
You’ll need: Aluminum tape / masking tape or something like that, scissors (or something to cut the aluminum tape), new mouse feet (if the old ones get damaged or you want to replace them).
How to fix pre-travel
After opening up the mouse you’ll be working with the top shell of the mouse. Locate the mouse button that needs to have it’s pre-travel fixed. Then cut some aluminum tape so that it mostly matches the size of the mouse button plunger. Then stick the aluminum tape on the part of the mouse button plunger that makes contact with the switch. You might need to use multiple layers of aluminum tape (most of the time it’s about 1-3 layers). First try putting in one piece of aluminum tape, close the mouse up, but don’t screw it together and test if there is still some pre-travel. Be careful not to put too many layers of aluminum tape on the mouse button plunger because it can make the switch actuate way too easily. If one piece of aluminum tape isn’t enough but two pieces of it is too many you can try putting some electrical tape instead because it is thinner than aluminum tape. After there isn’t any more pre-travel you can put the mouse back together and enjoy the lack of any pre-travel.
There is another method to fix pre-travel, you can also add some tape between the limiters of mouse buttons (they are located on the mouse skeleton and contact with actual pillars under mouse buttons when pushing the switch). You can apply tape on the bottom side of the limiter, or to the flat side of the pillar, which contacts the limiter. It will reduce pre-travel and make mouse buttons a little bit lower.
pulsar gaming gears

Mice & Accessories
- How can I resolve a double-clicking issue with my mouse?
- How can I troubleshoot issues with my mouse?
- How do I change the DPI?
- How can I disassemble my mouse?
- Will it work on an Apple computer?
- How to Resolve Mouse Scrolling Issues
- My mouse has a pre-travel click-like bump when I slightly press the button.
- Why isn't my Kovaak code working?
- Why are the markings on the ES2 Aim Trainer Edition not exactly 1cm?
- My X2V2/X2H works wired but not wireless, how can I fix this?
- I have a small hand, how big is the Xlite?
- I updated my Xlite and now the wireless is not working?
- Is the Xlite gaming mouse ambidextrous?
- How can I replace the cable on my Xlite V1 Wired gaming mouse?
- Experiencing Skipping, disconnection, freeze
- Can I install the Xlite micro bungee on my PC instead of my monitor?
- What is the process for installing the Xlite Grip Tape (Thin)?
- Why is the middle ring not included in the Superglide feet set?
- Does it work with a C to C type cable?
- What is the thickness of the Superglide feet?
- Default settings for eS model
- How to Purchase a Replacement eS Dongle for Your Wireless Mouse
- Is there any software compatible with eS models?
- How to assign a macro to eS mice?
- How to Deactivate the Side Buttons on Your X2A eS Mouse
Still need help?
You can always contact us by submitting a ticket!
IMAGES
VIDEO
COMMENTS
Process. The fix itself is very simple, you'll just be cutting the tape into small pieces and sticking them on the mouse button plungers until there's no more pre-travel. You can stack layers, but if you need 3+ I would just return the mouse (lol). If you don't know how to open your mouse, I'd suggest you Youtube a video for your model.
Fixing Pre-travel. To fix pre-travel you can pray to the QC gods so that your mouse comes perfect, or you can try using a different switch in your mouse that is taller. However, a simpler way to remove the space between your click and the switch is by adding PTFE/aluminum tape to cover the gap. Mod done on my HSK Pro 4K.
If there is still some pre-travel in your clicks, simply remove the mouse button assembly and repeat from stage 4. Once you're happy with your clicks you just reverse the process of disassembling the mouse - reattach the mouse buttons to the shell (feed the plungers through first), pop the rear of the top shell back on (it just pushes ...
This video will show you how to Fix Logitech G Pro X Superlight Pre-Travel and G Pro Wireless. Logitech G Pro Superlight vs G Pro Wireless Teardown @ https:...
Understanding Mouse Button Pre-Travel. Mouse button pre-travel is like the calm before the storm. It's that little moment between pressing down on a Mouse button and when the click actually gets recognized by your computer. In competitive gaming, this split-second can be the difference between victory and defeat.
Reviving the Mouse Clinic series to share the good word about Aluminium Tape and how it's been making my life easier for years now!It's rarely spoken about b...
For instance, installing new mouse skates involves carefully peeling off the old ones, cleaning up glue residue, and sticking on new ones. Another easy fix you can try is adding aluminum tape to the buttons to reduce pre-travel (the distance between the plastic mouse button and the switch), as demonstrated by the YouTuber Good Enough Tech ...
This test aims to provide actuation data to help you decide which mouse is right for you. Using a force testing machine, we test four points three times each along the main mouse button and provide an actuation graph, a force/distance graph, and switch information, including type and model. We created this test using data from over 24 mice ...
Hi, Few tricks and tips here to fix pre-travel on your GPX or GPW. These can also be used on other mice you will just need to adapt to them. The video is 24mins long so grab a brew so you can digest it all. Timestamps. 00:00 - Intro. 01:19 - Disassemble. 02:22 - Close look at stock side button pre-travel. 02:38 - First side button method.
This will usually go away after some usage. Most of the time you can easily fix it by popping the click shell out: pull it until the click shell's plunger goes out, then put it back into place, and repeat that several times. Watch this video to see how to do this. (The mouse in the video is a different model but the method is the same)
This is the result of this fix https://www.xbitlabs.com/fix-mouse-pre-travel/
Mice can come in both wired and wireless options. There is a preference for a wired mouse when it comes to gaming because there can be lag and interference issues with a wireless gaming mouse. The wireless mouse typically operates via bluetooth or the 2.4 GHz wireless frequencies used for cordless phones and Wi-Fi internet.
The amount of travel time between the first initial force on the click to the actuation of the switch on the pcb. Pre-travel is just the distance before the actual actuation of the button. The delay in actuation of a button could be the deciding factor in a high pace gaming exchange like aim duels.
How to fix pre-travel. After opening up the mouse you'll be working with the top shell of the mouse. Locate the mouse button that needs to have it's pre-travel fixed. Then cut some aluminum tape so that it mostly matches the size of the mouse button plunger. Then stick the aluminum tape on the part of the mouse button plunger that makes ...
My mouse has a pre-travel click-like bump when I slightly press the button. If your issue is the following: - Feeling of a tactile click when slightly touching the shell - Feeling of a step before the actuation point in the pre-trav...
This video attempts to explain what pre and post travel are on mouse switches. Hopefully you understand what it is after watching this
My mouse has a pre-travel click-like bump when I slightly press the button. Why isn't my Kovaak code working? Why are the markings on the ES2 Aim Trainer Edition not exactly 1cm? My X2V2/X2H works wired but not wireless, how can I fix this? See all 8 articles. Xlite Series 7. I have a small hand, how big is the Xlite?
The buttons should rest on the switch trigger. I did this on my Bruce Lee were the right click had floating pre-travel. You can also put some aluminum tape on the piece of plastic that touches the switch trigger. To reduce the gap. But this does make the button "stick upwards" more. 8.
Of those that are left, these few are the ones I'd personally recommend for remote work, plus a dual-use option that works as well for mobile gaming as it does for spreadsheet scrolling. Best Travel Mouse: Logitech MX Anywhere 3S. Size: 4.0 x 2.6 x 1.4 inches. Battery Life: Up to 70 days.
For anyone that is unable to get support from Finalmouse and don't want to return the mouse for a refund and wait X amount of time for batch #3, I made a quick guide on how to fix the issue yourself. It's quite easy. If you've ever installed a paracord before you'll be able to do this fix.
This BenQ Zowie ZA11 Gaming Mouse Pre Travel Post Travel video is showing if there is any pre or post travel in the mouse button.@zowiebybenqusa #zowie #csg...
In most switch types except standard rubber dome over membrane keyboards, a switch will actuate before it is bottomed out. The terms "pretravel" and "operating travel" refer to how far down the key must be pressed for it to actuate. Pretravel is typically around of half travel. Once the pretravel has been reached, the operator is free to let go ...
Ye. Idk if any zowie mice have noticeable post travel (maybe ec series), but if they do, then I don't mind it. (I've used all zowie mice -AM) But if a mouse have a lot of pre travel, that's pretty annoying. I never come across the two terms before i bought the model o- and mm711. Ive been using mostly Logitech mice and they were very solid.